Looking for a sweet treat that brings fun to the table? Try my Chocolate Gnome Cheesecakes! These simple and tasty desserts will delight both kids and adults alike. With rich cream cheese, crunchy chocolate crust, and cute gummy gnomes, they are perfect for any gathering. In this blog post, I will share easy steps and helpful tips to make your cheesecake shine. Let’s get baking and create delicious memories!
Why I Love This Recipe
- Decadent Flavor: This cheesecake combines rich chocolate with a creamy texture, making it an irresistible dessert for chocolate lovers.
- Fun Presentation: The gummy gnomes add a whimsical touch that makes these cheesecakes perfect for parties and gatherings.
- Easy to Make: With simple ingredients and straightforward steps, this recipe is accessible even for novice bakers.
- Perfectly Portion-Controlled: Individual servings mean you can enjoy a rich dessert without overindulging.
Ingredients
Main Ingredients for Cheesecakes
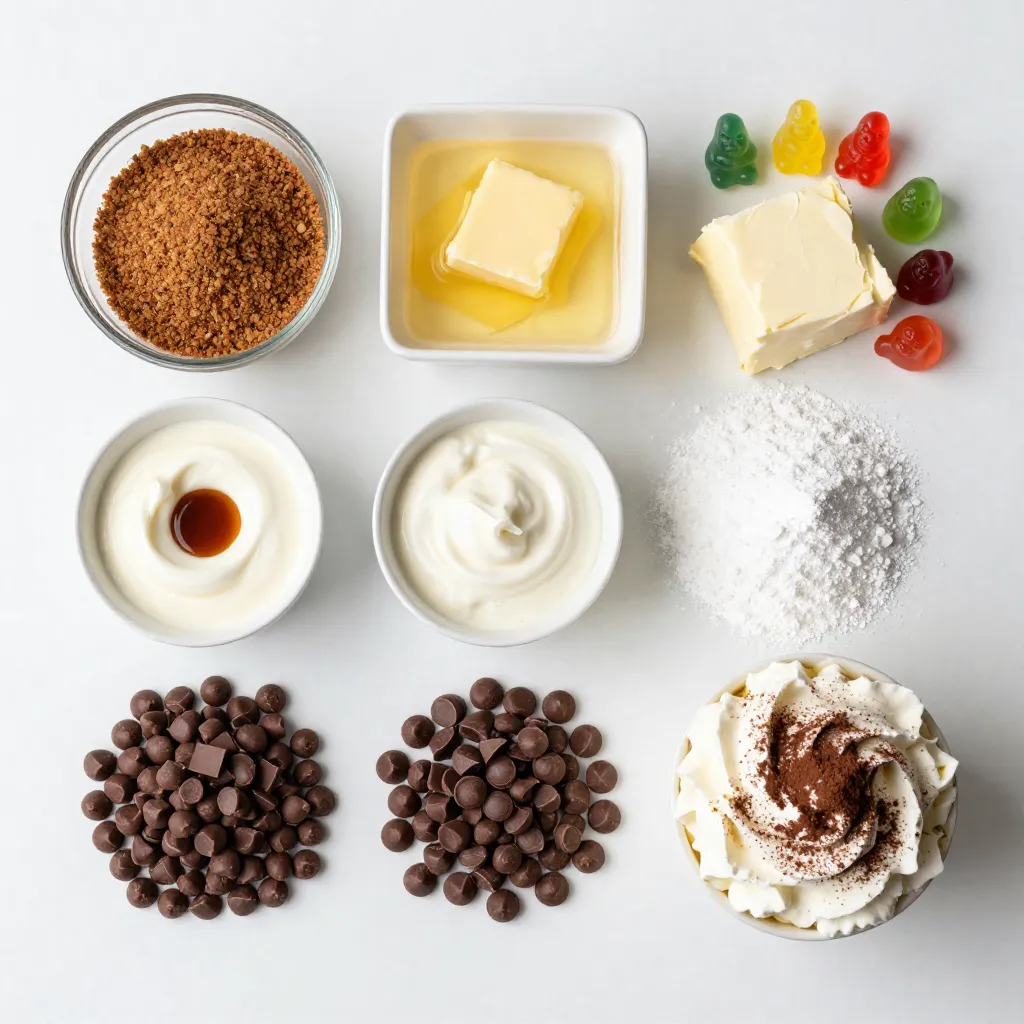
– 1 ½ cups chocolate graham cracker crumbs
– ½ cup unsalted butter, melted
– 2 cups cream cheese, softened at room temperature
– 1 cup powdered sugar
The main ingredients create a rich and creamy base. The chocolate graham cracker crumbs give a sweet, chocolatey flavor. Unsalted butter helps bind the crust together, making it firm and crunchy. Cream cheese adds smoothness, while powdered sugar sweetens the filling.
Additional Ingredients
– ½ cup sour cream
– 1 teaspoon vanilla extract
– ½ cup semi-sweet chocolate chips, melted and slightly cooled
– 1 cup whipped cream (for topping)
Sour cream adds tanginess to the cheesecake, balancing the sweetness. Vanilla extract enhances the flavors, making the dessert even more delicious. The melted chocolate chips bring a deep chocolate taste, while whipped cream makes each bite light and airy.
Decorative Elements
– Gummy gnomes
– Cocoa powder (for dusting)
Gummy gnomes add a fun twist to your cheesecakes. They make the dessert look playful and perfect for any celebration. Cocoa powder dusted on top gives a finishing touch, adding a touch of elegance and richness.
Step-by-Step Instructions
Preheat and Prepare
First, preheat your oven to 325°F (160°C). This step is key for even baking. While the oven heats, we’ll make the crust. In a medium bowl, mix 1 ½ cups of chocolate graham cracker crumbs with ½ cup of melted unsalted butter. Stir well until the crumbs feel moist.
Next, take your mixture and spoon it into cupcake liners or a mini cheesecake pan. Press the crumb mixture firmly into the bottom. This gives you a nice, even crust. Bake for 8-10 minutes until it’s slightly set. Once done, take it out and let it cool completely.
Assembling the Cheesecake Layers
In a large bowl, beat 2 cups of softened cream cheese using an electric mixer. Mix until it’s smooth. Gradually add 1 cup of powdered sugar, mixing on low speed. Keep going until the sugar is fully mixed in and you have a lump-free mixture.
Now, mix in ½ cup of sour cream and 1 teaspoon of vanilla extract. Blend until everything is smooth. Once that’s done, fold in ½ cup of melted semi-sweet chocolate. Use a spatula or wooden spoon for this. Be careful not to overmix; just combine until you see no streaks.
Baking and Cooling the Cheesecakes
Now it’s time to fill the crusts. Spoon the cheesecake mixture evenly over the cooled crusts. Smooth the tops if needed. Place them in the oven and bake for 20-25 minutes. You want the edges to be set, but the center should still jiggle a bit.
When baking is done, turn off the oven and leave the cheesecakes inside with the door slightly ajar for 20 minutes. This helps prevent cracks. After that, take them out and let them cool to room temperature.
Once they’ve cooled, move them to the fridge. Chill for at least 2 hours, or until they are fully cold and firm.
Tips & Tricks
Achieving the Perfect Crust
To make a great crust, use the right method. Start by mixing chocolate graham cracker crumbs with melted butter. Ensure the crumbs coat well.
When pressing the mixture into the pan, use a flat-bottomed glass. This helps create an even layer. Press firmly but gently.
Bake the crust for 8-10 minutes. This sets it nicely. Let it cool completely before adding the filling. A well-baked crust should feel firm but still soft.
Ensuring Creamy Filling
Next, we focus on the cheesecake filling. To avoid lumps, make sure the cream cheese is at room temperature.
Start mixing it slowly with an electric mixer. Add powdered sugar gradually. This keeps the mixture smooth and creamy.
When you fold in chocolate, do it gently. Use a spatula and mix until no streaks are left. Overmixing can make your filling tough.
Preventing Cracks
Cooling is key to keep your cheesecakes crack-free. After baking, turn off the oven. Leave the cheesecakes inside with the door slightly open for 20 minutes. This helps them cool slowly.
If you want, use a water bath while baking. Place the cheesecake pan in a larger pan filled with water. This keeps the temperature steady and prevents cracks.
By using these tips, you can make Chocolate Gnome Cheesecakes that are smooth and delicious. Enjoy your baking!
Pro Tips
- Use Room Temperature Ingredients: Ensuring your cream cheese is at room temperature will help achieve a smooth and creamy texture without lumps.
- Don’t Overmix the Filling: When incorporating the melted chocolate, be gentle to prevent incorporating too much air, which can lead to cracks during baking.
- Cooling Technique: Allowing the cheesecakes to cool in the oven with the door ajar helps prevent sudden temperature changes that can cause cracks.
- Garnish with Care: Add the gummy gnomes just before serving to keep them fresh and vibrant, ensuring they remain a fun surprise for your guests!
Variations
Flavor Swaps
You can easily change up the flavors in your Chocolate Gnome Cheesecakes. Adding raspberry or caramel to the filling gives a sweet twist. For a fruity touch, try fresh raspberries. They add a nice tartness. If you want something richer, caramel works great too. Just swirl it in before baking.
You can also use different types of chocolate. Dark chocolate gives a bold flavor. White chocolate makes it sweeter and creamier. Mix and match to find your favorite blend.
Ingredient Adjustments
Want to make your cheesecakes gluten-free? It’s simple! Use crushed gluten-free cookies instead of chocolate graham crackers for the crust. You can find many options in stores today.
For a vegan version, switch to plant-based cream cheese. Use coconut cream instead of sour cream. You can also replace the butter with coconut oil. These swaps keep the taste rich while making it plant-based.
Decoration Ideas
Get creative with the toppings! Besides gummy gnomes, you can use chocolate-covered strawberries or edible flowers for a fun twist.
Seasonal garnishes can make your cheesecakes special too. Add crushed peppermint for winter or fresh berries in summer. These little touches make your dessert stand out at any gathering!
Storage Info
Refrigeration Guidelines
To keep your Chocolate Gnome Cheesecakes fresh, store them in the fridge. Place them in an airtight container. This will help prevent them from drying out or absorbing odors. They will last up to five days in the fridge. Always check for any signs of spoilage before serving.
Freezing Options
If you want to keep the cheesecakes longer, freezing is a great option. Wrap each cheesecake tightly in plastic wrap. Then, place them in a freezer-safe bag or container. They can last up to three months in the freezer. When you’re ready to enjoy them, move them to the fridge for a few hours to thaw. For the best texture, let them thaw slowly in the fridge overnight.
Packaging for Transport
If you plan to take your cheesecakes to a party, packaging them well is key. Use a sturdy container that can hold the cheesecakes securely. You can also use cupcake boxes for individual servings. To make a great presentation, consider adding extra toppings, like chocolate shavings, around the cheesecakes. This will make them look even more appealing at gatherings.
FAQs
What is the best way to ensure my cheesecakes do not crack?
To avoid cracks, control the temperature and moisture. Common causes include overbaking and rapid cooling.
– Bake at the right temperature: Keep your oven at 325°F (160°C).
– Check for doneness: The edges should be set, but the center should jiggle slightly.
– Cool gradually: After baking, leave the cheesecakes in the oven with the door ajar for 20 minutes. This step helps avoid sudden temperature changes.
– Use a water bath: If you want, place your cheesecake pan in a larger pan filled with water. This method adds moisture during baking.
Using these tips, you can keep your cheesecakes smooth and crack-free.
Can I use a different type of crust?
Yes, you can! If you want to switch things up, try these alternatives to chocolate graham cracker crust:
– Regular graham cracker crust: This classic option works well with many flavors.
– Oreo crust: Crush chocolate sandwich cookies for a rich flavor.
– Nut crust: Use ground almonds or walnuts for a gluten-free option.
– Shortbread crust: This adds a buttery taste and pairs nicely with chocolate.
Feel free to experiment with different flavors and textures that fit your taste.
How long do I need to chill the cheesecakes?
Chilling is crucial for texture. After baking, let the cheesecakes cool to room temperature. Then, chill them in the fridge for at least:
– 2 hours: This is the minimum for good firmness.
– Overnight: For the best texture and flavor, chill overnight if you can.
Factors like room temperature and cheesecake size can affect chilling time. Be patient for the best results.
Are there any allergen considerations?
Absolutely! You can make substitutions for common allergens:
– Dairy-free: Use vegan cream cheese and coconut cream instead of sour cream.
– Gluten-free: Try a gluten-free crust made from ground nuts or gluten-free cookies.
– Nut-free: If nuts are a concern, stick with traditional graham crackers or use cookies that are nut-free.
Always check labels to ensure your ingredients are safe for everyone. Making these swaps allows more people to enjoy your delicious cheesecakes!
In this article, we explored the key ingredients for a delicious cheesecake, from chocolate graham cracker crumbs to creamy fillings and fun toppings. You learned how to prepare, bake, and cool your cheesecake to perfection. With helpful tips for a smooth texture and creative variations, you can make this dessert your own. Remember, storage matters too, so follow our guidelines for keeping your cheesecake fresh. Dive into your cheesecake journey and enjoy each bit