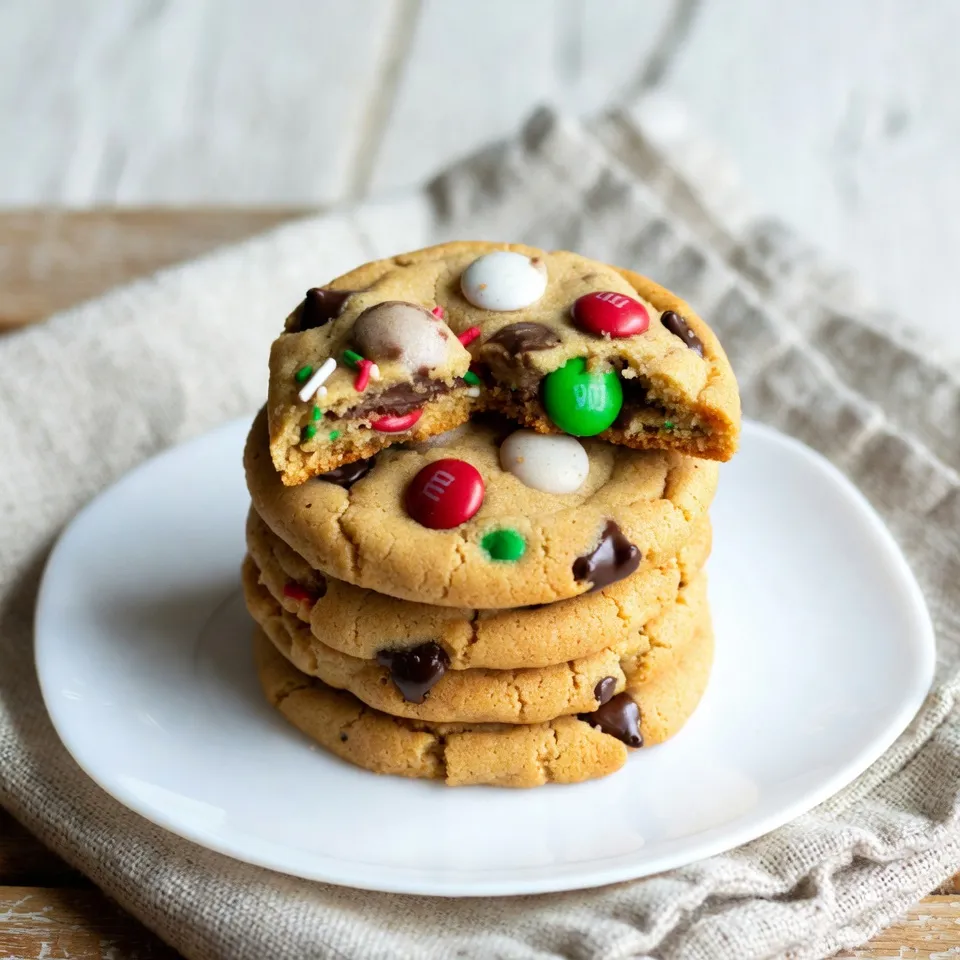
Get ready for a delicious holiday treat! Christmas Cookie Monster Cookies are fun and festive delights that everyone will love. With colorful M&M’s and gooey chocolate chips, these cookies are perfect for sharing or keeping all to yourself. In this guide, I will walk you through simple steps, offer tips for perfect texture, and even share storage secrets. Get your apron on, and let’s bake some magic this Christmas!
Why I Love This Recipe
- Festive Flavors: These cookies are packed with holiday cheer, thanks to the colorful M&M’s and rich chocolate chips that make every bite a celebration.
- Easy to Make: This recipe is simple and straightforward, making it perfect for bakers of all skill levels to whip up a batch of delightful cookies.
- Perfect Texture: With a soft center and slightly crispy edges, these cookies offer a satisfying texture that keeps everyone coming back for more.
- Great for Sharing: These cookies are a hit at holiday gatherings and make for a thoughtful homemade gift for friends and family, spreading joy with every bite.
Ingredients
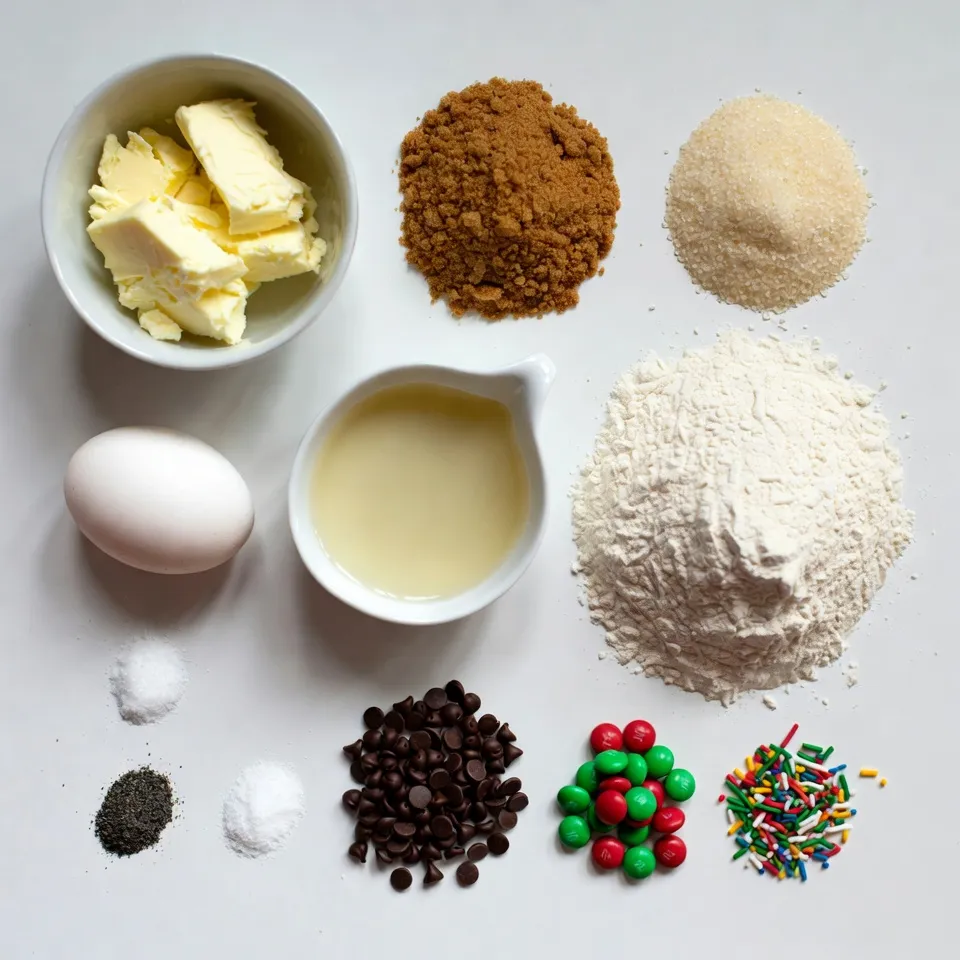
List of Ingredients
– 1 cup unsalted butter, softened to room temperature
– 1 cup brown sugar, tightly packed
– 1/2 cup granulated sugar
– 1 large egg, at room temperature
– 2 teaspoons pure vanilla extract
– 2 1/2 cups all-purpose flour
– 1 teaspoon baking soda
– 1 teaspoon fine sea salt
– 1 cup mini chocolate chips
– 1 cup Christmas-themed M&M’s
– 1 tablespoon colorful sprinkles (for decoration, optional)
When I make Christmas Cookie Monster Cookies, I love using these simple ingredients. They come together to create a soft and chewy cookie filled with festive joy. Each ingredient plays a role in building flavor and texture.
Optional Decoration Items:
You can add colorful sprinkles for a fun touch. Sprinkles bring a joyful look to the cookies. They also add a little crunch. You can use any type of sprinkles you like!
Step-by-Step Instructions
Preheat and Prepare
Start by preheating your oven to 350°F (175°C). This temperature works best for baking cookies. Next, line two baking sheets with parchment paper. This step makes cleanup easy and helps the cookies not stick.
Cream the Butters and Sugars
In a large mixing bowl, add 1 cup of softened unsalted butter, 1 cup of packed brown sugar, and 1/2 cup of granulated sugar. Use a hand mixer or a stand mixer. Mix these on medium speed for about 3-4 minutes. You want the mixture to be light and fluffy. This step adds air to the dough and makes the cookies soft.
Incorporate Egg and Vanilla
Now, it’s time to add one large egg and 2 teaspoons of pure vanilla extract to the bowl. Beat this mixture again until everything is mixed well. Make sure there are no streaks of egg left. This part helps bind the dough together.
Mix Dry Ingredients
In another bowl, whisk together 2 1/2 cups of all-purpose flour, 1 teaspoon of baking soda, and 1 teaspoon of fine sea salt. Gradually add this dry mixture to the wet mixture. Mix until just combined to avoid overworking. Overmixing can make the cookies tough.
Fold in the Goodies
Gently fold in 1 cup of mini chocolate chips and 1 cup of festive Christmas-themed M&M’s using a rubber spatula. Be sure to mix them evenly throughout the dough. This step adds fun and flavor to each bite.
Scoop and Bake
Using a cookie scoop or a tablespoon, portion the dough onto the prepared baking sheets. Space each cookie about 2 inches apart. This allows the cookies to spread while baking. Bake them in the oven for 10-12 minutes, but keep an eye on them. The edges should be lightly golden, while the centers remain soft.
Cool Down
Once the cookies are baked, remove them from the oven. Let them cool on the baking sheet for about 5 minutes. Then, transfer them to a wire rack to cool completely. Cooling is key to getting the right texture. Enjoy the smell of fresh cookies!
Tips & Tricks
Achieving the Perfect Texture
When baking cookies, the key is to know when to stop. Underbaking yields soft, chewy cookies. Overbaking gives you crunchy treats. For the best texture, take them out when the edges are golden and the centers look a bit shiny. They will firm up as they cool.
Decorating Ideas
Make your cookies shine with fun decorations! After baking, try drizzling melted chocolate over the tops. You can also add colorful sprinkles or extra M&M’s for a festive touch. Stacking them on a lovely plate adds to the holiday charm. A sprinkle of powdered sugar can make them look extra special.
Troubleshooting Common Issues
Sometimes cookie dough can be tricky. If your dough is too crumbly, mix in a little milk. This helps bind it together. If it’s too sticky, add a bit more flour. Always remember to measure your ingredients carefully. This will help you avoid common problems and create perfect cookies every time!
Pro Tips
- Chill the Dough: For thicker cookies, chill the dough for at least 30 minutes before baking. This helps prevent spreading and gives the cookies a better texture.
- Use Room Temperature Ingredients: Ensure your butter and egg are at room temperature for a smoother batter and better incorporation of ingredients.
- Don’t Overbake: To achieve soft and chewy cookies, take them out of the oven when the edges are golden but the centers are still slightly underbaked. They will continue to cook on the baking sheet.
- Storage Tip: Store cookies in an airtight container at room temperature for up to a week, or freeze for longer storage. Layer with parchment paper to prevent sticking.
Variations
Ingredient Swaps
You might want to try different sugars or flours. For a healthier option, use coconut sugar instead of brown sugar. This gives a slight caramel flavor while lowering the glycemic index. If you’re gluten-free, replace all-purpose flour with almond flour. It adds a nutty taste and keeps cookies soft.
Themed Variations
Get creative with themes! For Halloween, swap Christmas-themed M&M’s for orange and black candies. You can even change the sprinkles to match the season. For birthdays, use colorful sprinkles and mix in pastel candies. This makes the cookies fun for any occasion!
Flavor Enhancements
Consider adding fun mix-ins. Try adding crushed peppermint candies for a minty twist. You can also mix in nuts like walnuts or pecans for crunch. Another great idea is to add dried fruits like cranberries or cherries for a tangy flavor. These simple changes keep your cookies exciting!
Storage Info
Best Practices for Storing Cookies
When storing your Christmas Cookie Monster cookies, keep them in an airtight container. This helps keep them soft and fresh. You can store them at room temperature for up to a week. If you live in a humid area, refrigeration might be better. However, cold air can make cookies hard.
Freezing Cookies
Freezing cookies is easy and fun! To freeze, let the cookies cool completely. Then, place them in a single layer on a baking sheet and freeze for 1-2 hours. Once frozen, transfer them to a freezer bag. Remove as much air as possible before sealing. They can last up to three months in the freezer. You can bake them straight from the freezer. Just add a couple of extra minutes to the baking time.
Shelf Life
Understanding how long cookies last is key to enjoying them. At room temperature, these cookies stay fresh for about seven days. In the fridge, they can last up to two weeks. When frozen, they taste great up to three months later. Just remember to check for any signs of freezer burn to keep them at their best!
FAQs
How long do these cookies last?
These cookies can last up to a week. Store them in an airtight container at room temperature. If you want them to stay fresh longer, keep them in the fridge.
Can I make the dough ahead of time?
Yes, you can prepare the dough ahead of time. Wrap it well in plastic wrap and keep it in the fridge for up to three days. This way, you can bake fresh cookies whenever you want.
What can I substitute for chocolate chips?
You can use white chocolate chips, butterscotch chips, or even chopped nuts. They add a fun twist to your cookies. Just make sure to keep the same amount.
Are these cookies suitable for freezing?
Yes, you can freeze these cookies! After baking, let them cool completely. Place them in a single layer on a baking sheet. Freeze until firm, then transfer to a freezer bag. They can last up to three months.
This article covered everything you need to bake tasty cookies. You learned the right ingredients, step-by-step instructions, and helpful tips. We explored fun variations and how to store cookies for freshness. Remember, cookie baking can be creative and enjoyable. Use these techniques to impress friends and family. Now, get in the kitchen and start baking those delicious cookie