
Are you ready to dive into a dish that brings warmth and joy? Creamy Baked Penne is rich, comforting, and perfect for any meal. I’ll guide you through simple steps and tips to create this delightful pasta. From selecting top-notch ingredients to perfecting the creamy texture, you’ll master this recipe in no time. Let’s make magic happen in your kitchen!
Why I Love This Recipe
- Comforting and Creamy: This baked penne dish is a perfect blend of creamy ricotta and gooey mozzarella, making it a comforting meal that warms the soul.
- Easy to Prepare: With simple ingredients and straightforward steps, this recipe is perfect for both novice cooks and busy weeknights.
- Customizable: You can easily add your favorite vegetables or proteins to this dish, making it versatile for any taste preference.
- Great for Leftovers: This creamy baked penne tastes just as delicious the next day, making it an excellent choice for meal prep!
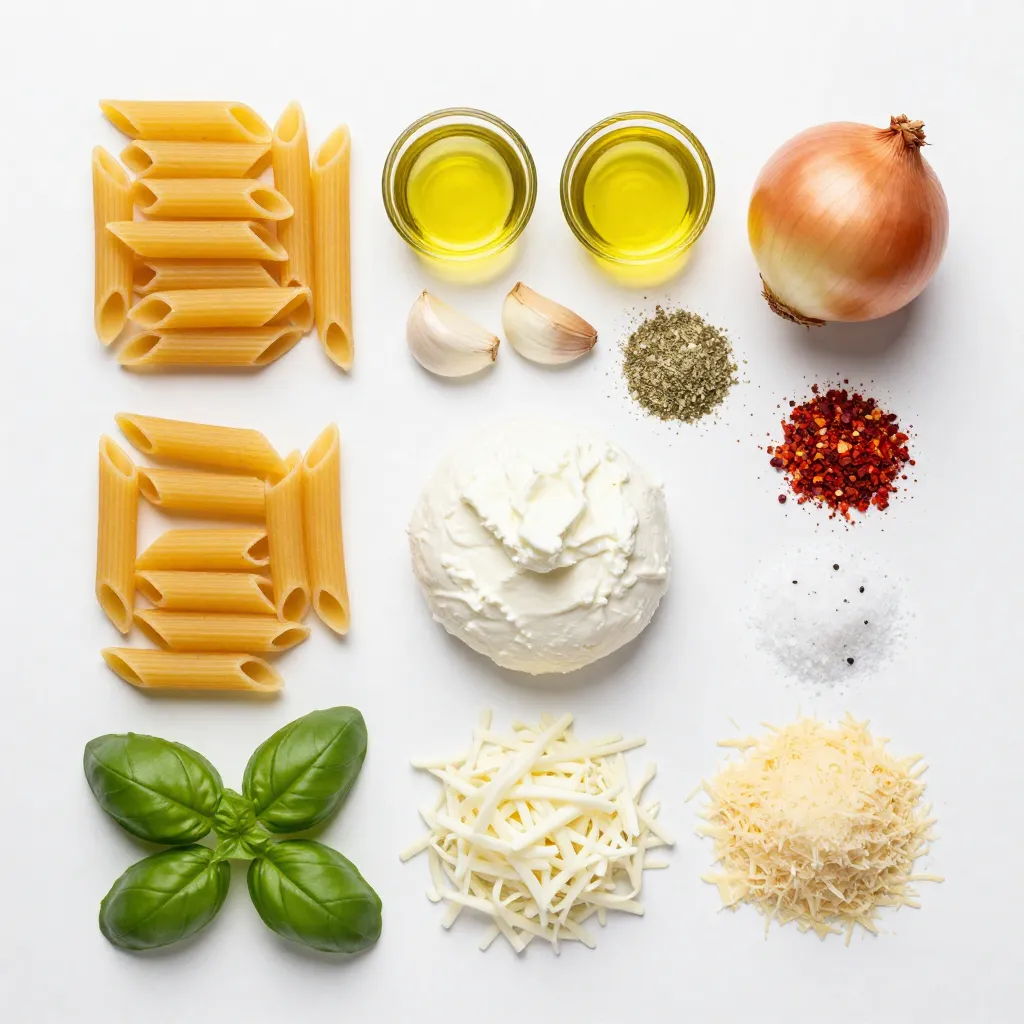
Ingredients
Full Ingredients List
– 12 ounces penne pasta
– 2 tablespoons extra virgin olive oil
– 1 medium onion, finely chopped
– 3 cloves garlic, minced
– 1 teaspoon Italian seasoning blend
– 1/2 teaspoon red pepper flakes (optional, for a spicy kick)
– 2 cups creamy ricotta cheese
– 1 cup shredded mozzarella cheese, plus extra for topping
– 1 cup grated Parmesan cheese, divided
– 1/2 cup fresh basil leaves, roughly chopped
– Salt and freshly ground black pepper, to taste
– 1 cup marinara sauce (your choice: homemade or store-bought)
Ingredient Substitutions
You can swap ingredients based on what you have. If you lack penne, use any pasta shape you enjoy. For ricotta, cottage cheese works well too. You can also change mozzarella for another cheese, like cheddar. If you want a vegan option, try almond ricotta or tofu blend instead. Fresh herbs can be replaced with dried ones if fresh is not available.
Notes on Quality Ingredients
Using good-quality ingredients makes a big difference. Choose fresh basil for a bright flavor. A high-quality olive oil adds depth. Look for whole milk ricotta for creaminess. Freshly grated Parmesan tastes better than the pre-grated kind. Always taste your marinara sauce. A good sauce can elevate your dish.
Step-by-Step Instructions
Preparation Steps
1. Preheat your oven to 375°F (190°C). This warms the oven for perfect baking.
2. Cook 12 ounces of penne pasta until it is al dente, or firm to the bite. Drain the pasta well and set it aside.
3. In a large skillet, heat 2 tablespoons of extra virgin olive oil over medium heat. Add 1 medium onion, finely chopped, and sauté for about 5 minutes. The onion should turn translucent.
4. Next, add 3 cloves of minced garlic, 1 teaspoon of Italian seasoning, and 1/2 teaspoon of red pepper flakes if you want a spicy kick. Cook for another 1-2 minutes until the garlic is lightly golden.
Cooking Instructions
5. In a big mixing bowl, combine the cooked penne with the sautéed onion and garlic mixture. Then add 2 cups of creamy ricotta cheese, 1/2 cup of shredded mozzarella, and 1/2 cup of grated Parmesan cheese. Toss in 1/2 cup of roughly chopped fresh basil too.
6. Season this mixture generously with salt and freshly ground black pepper. This step is key to making flavors pop.
7. Pour 1 cup of marinara sauce over the pasta mixture. Gently stir everything until well mixed.
Baking Directions
8. Transfer the creamy pasta mixture to a greased 9×13 inch baking dish. Spread it out evenly.
9. Top the dish with the remaining mozzarella and Parmesan cheese for that cheesy crust we all love.
10. Cover the baking dish with aluminum foil and place it in your preheated oven. Bake for 25 minutes.
11. After 25 minutes, carefully remove the foil. Continue baking for an extra 15-20 minutes. Look for melted, golden, and bubbling cheese on top.
12. Once it’s baked, let the dish cool for a few minutes. This helps the flavors settle and makes it easier to serve.
Tips & Tricks
How to Perfect the Creamy Texture
To get that creamy texture, use full-fat ricotta cheese. It gives the best taste. Mix it well with the pasta and other cheeses. This helps it coat every piece evenly. Adding a bit of the pasta water helps too. This water has starch that makes the sauce smooth. If you want it creamier, stir in a splash of heavy cream before baking.
Spice It Up: Adding Heat
If you like a kick, add red pepper flakes. Just half a teaspoon works great. You can also use spicy sausage or diced jalapeños for more heat. Taste as you go to find your perfect level of spice. Just remember, it’s easier to add heat than to take it away!
Serving Suggestions for Presentation
For a pretty plate, serve the creamy baked penne in bowls. Top each bowl with fresh basil leaves. A sprinkle of Parmesan adds a nice touch too. Drizzle some olive oil over the top for shine. It makes the dish look inviting and delicious!
Pro Tips
- Choose the Right Pasta: Opt for a sturdy pasta like penne that holds the creamy sauce well and provides a delightful texture in every bite.
- Mix Cheeses for Flavor: Combine different cheeses such as ricotta, mozzarella, and Parmesan to create a rich and complex flavor profile.
- Add Fresh Herbs: Incorporate fresh herbs like basil or parsley into the pasta mixture for a burst of freshness that elevates the dish.
- Let it Rest: Allow the baked penne to cool for a few minutes before serving; this helps the flavors meld and makes serving easier.
Variations
Vegetarian Options
You can easily make Creamy Baked Penne vegetarian. Skip the meat and add veggies. Try spinach, mushrooms, or zucchini. These add great taste and color. You can also add more cheese. A mix of mozzarella and Parmesan works wonders. Fresh herbs like thyme or oregano can boost flavor too.
Meat Add-ins
Want to add some protein? Chicken or sausage fits right in. For chicken, use cooked and diced pieces. For sausage, try Italian sausage for a spicy kick. Cook the sausage first, then mix it in with the pasta. This gives a hearty touch to your dish.
Gluten-Free Alternatives
If you need a gluten-free option, swap penne with gluten-free pasta. There are many types available today. Check labels to ensure they fit your needs. The baking method stays the same, so no worries there. Enjoy the creamy goodness without the gluten!
Storage Info
How to Store Leftovers
After enjoying your creamy baked penne, you may have some left. Store leftovers in an airtight container. Let the dish cool to room temperature first. This keeps it fresh in the fridge for up to three days. Make sure to label the container with the date to track its freshness.
Reheating Instructions
When you’re ready to enjoy leftovers, preheat your oven to 350°F (175°C). Place the creamy baked penne in an oven-safe dish. Cover it with foil to keep it moist. Heat for about 20 minutes, or until warmed through. You can also microwave individual portions. Just use a microwave-safe bowl and heat in short bursts, stirring in between.
Freezing Tips
If you want to save some for later, freezing is a great option. Let the dish cool completely before freezing. Use a freezer-safe container or wrap it tightly with plastic wrap and foil. This helps prevent freezer burn. Creamy baked penne can last up to three months in the freezer. When ready to eat, thaw it overnight in the fridge before reheating.
FAQs
What can I use instead of ricotta cheese?
You can use cottage cheese as a substitute for ricotta. Cottage cheese has a similar texture and mild flavor. You can also try cream cheese for a richer taste. Blend it first to make it smooth. Other options include mascarpone or even Greek yogurt for a tangy twist. Each choice adds a unique flavor, so pick based on what you enjoy.
Can I make Creamy Baked Penne ahead of time?
Yes, you can prepare this dish in advance. Cook the pasta and mix all ingredients as per the recipe. Then, place it in your baking dish, cover it, and store it in the fridge. You can make it a day ahead. When you’re ready to bake, just add extra baking time since it will be cold. This makes meal prep easy and saves time.
How do I know when it’s done baking?
To check if your penne is done, look for a golden brown crust on top. The cheese should be melted and bubbling. You can insert a fork into the center to see if it’s hot throughout. If it is, your dish is ready to serve. Let it cool for a few minutes before serving for the best taste.
This blog post covered the key ingredients, step-by-step instructions, and helpful tips for the dish. You learned how to choose quality ingredients and make tasty swaps. The preparation and cooking steps are simple to follow. Plus, using my tips can help you get the perfect creamy texture. Don’t forget the variations to fit your diet, like vegetarian or gluten-free options. Finally, proper storage will keep your leftovers fresh. Enjoy trying this dish, and impress your friends and family with your skill