If you crave something crispy, savory, and totally satisfying, let’s dive into Japanese Katsu Bowls! This quick and tasty recipe pairs juicy chicken with a delightful crunch. You’ll learn how to get the perfect texture and flavor in no time. Get your ingredients ready, and let’s start making a meal that impresses. Your taste buds will thank you!
Why I Love This Recipe
- Delicious Crunch: The panko breadcrumbs create a wonderfully crispy texture that contrasts perfectly with the tender chicken.
- Quick and Easy: This recipe comes together in just 30 minutes, making it perfect for a weeknight dinner.
- Customizable Bowls: You can personalize your katsu bowls with your favorite toppings, such as avocado, pickles, or even a fried egg.
- Family Favorite: Everyone loves a good katsu bowl, making it a hit for family meals or entertaining guests.
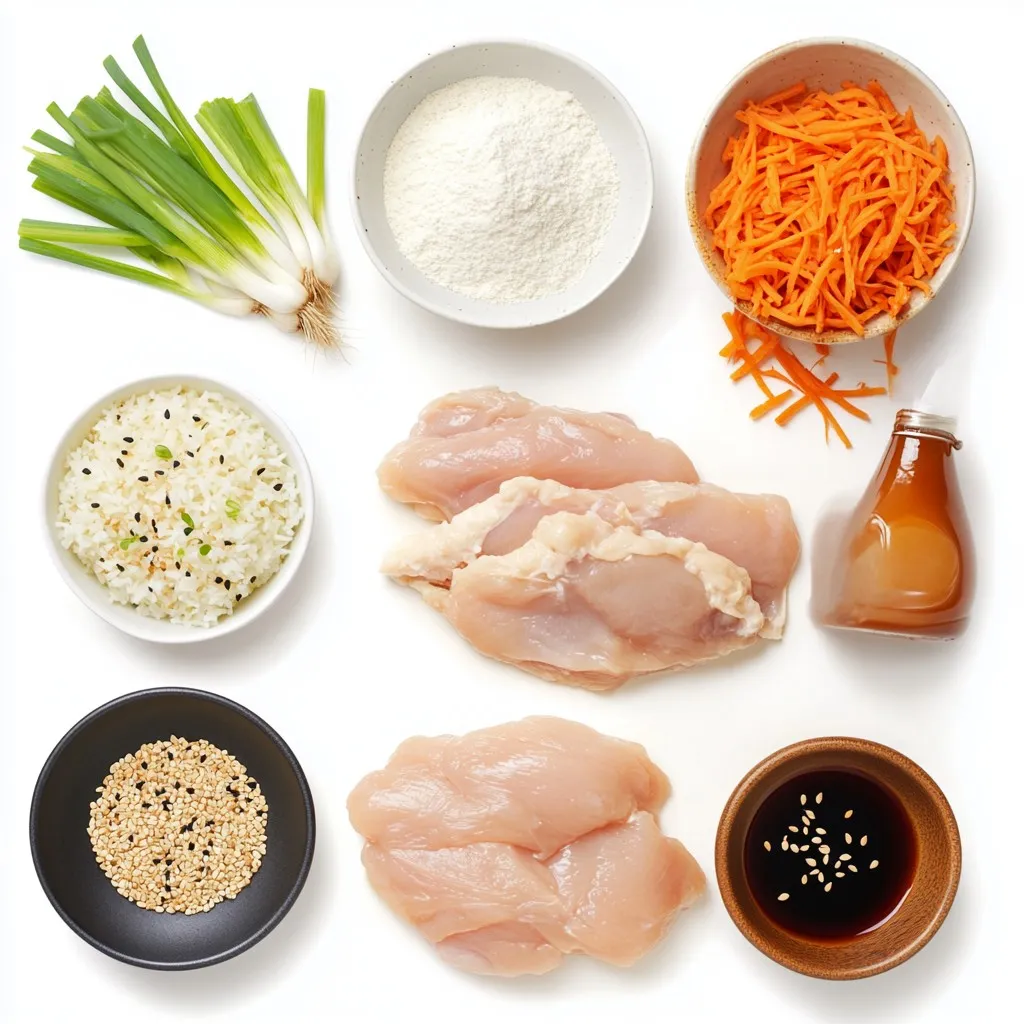
Ingredients
Main Ingredients
– 2 chicken breasts, pounded to an even thickness
– Salt and pepper, to taste
– 1 cup all-purpose flour
– 2 large eggs, beaten until frothy
– 1 ½ cups panko breadcrumbs
– Vegetable oil, for frying
– 2 cups cooked jasmine rice
– 1 cup finely shredded cabbage
– ½ cup sliced green onions
– ½ cup tonkatsu sauce
– Sesame seeds, for garnish
The main ingredients in this recipe are simple but essential. The chicken breasts are the star. Pounding them helps them cook evenly and stay juicy. Salt and pepper enhance the chicken’s flavor. The flour, eggs, and panko breadcrumbs create a crispy coating. Panko gives that extra crunch we love. The vegetable oil is key for frying. It helps achieve that golden brown color. Jasmine rice serves as a soft base, and the cabbage adds a nice crunch.
Optional Garnishes
– Tonkatsu sauce
– Sesame seeds
– Green onions
These garnishes elevate your katsu bowls. Tonkatsu sauce adds a sweet and tangy flavor, making the dish shine. Sesame seeds offer a nutty crunch, while green onions bring freshness and color. You can mix and match these garnishes based on your taste. Each adds a unique touch to your katsu bowl. Enjoy experimenting with them!
Step-by-Step Instructions
Preparation of Chicken
First, season the chicken breasts with salt and pepper. This brings out their flavor. Next, pound them gently to an even thickness. This step helps them cook evenly. Now, set up your breading station. Place three shallow dishes in a line. Fill one with flour, the second with beaten eggs, and the last with panko breadcrumbs. This setup makes breading quick and easy.
Breading Process
Start the breading process by dredging each chicken breast in flour. Shake off any extra flour. Then dip the chicken into the beaten eggs. Let the excess egg drip back into the bowl. Finally, coat the chicken with panko breadcrumbs. Press down lightly so the crumbs stick well. This will give your katsu a crunchy texture.
Cooking the Chicken
Heat vegetable oil in a large skillet. You want enough oil to cover about half an inch of the pan. Heat the oil over medium until it shimmers. To check if it’s ready, drop in some breadcrumbs. If they sizzle, the oil is hot. Carefully place the breaded chicken in the oil. Fry each side for 4-5 minutes until golden brown. The chicken should reach an internal temperature of 165°F (75°C). Once cooked, transfer the chicken to a paper towel-lined plate to soak up extra oil.
Assembling the Bowls
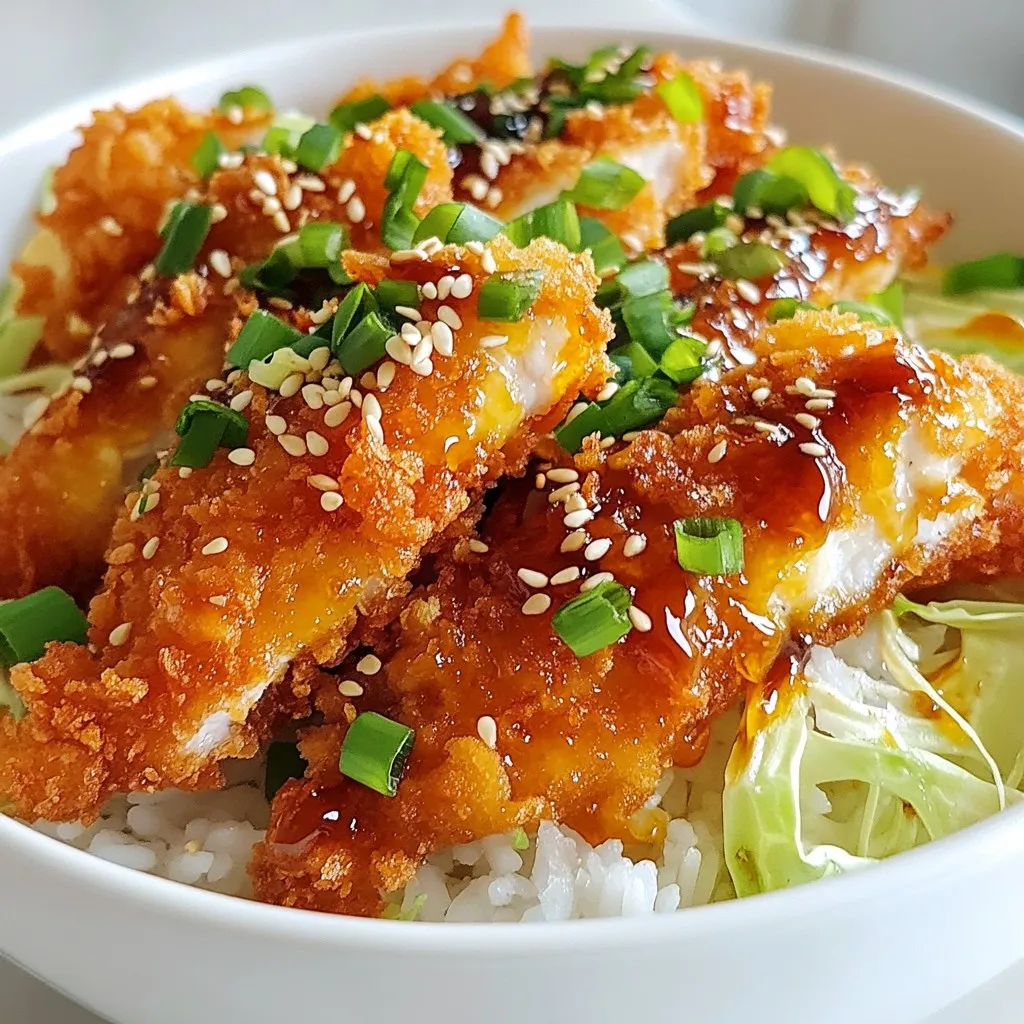
Now it’s time to assemble your bowls. Start with a generous layer of cooked jasmine rice in each bowl. Next, add a handful of finely shredded cabbage on top of the rice. Arrange your sliced chicken strips artfully on the cabbage. This makes the dish look inviting and delicious.
Tips & Tricks
Achieving the Perfect Crispy Texture
To get that perfect crispy texture, follow these steps:
– Oil temperature guidelines: Heat the oil to about 350°F (175°C). Use a thermometer to check. If you don’t have one, drop in a few breadcrumbs. If they sizzle right away, the oil is ready.
– Ensuring even breading: When breading your chicken, make sure to coat it evenly. Press the panko crumbs firmly onto the chicken. This helps the crumbs stick better, leading to a crunchier bite.
Serving Suggestions
For a delightful katsu bowl, consider these ideas:
– Ideal accompaniments for katsu bowls: Serve your katsu over jasmine rice. Add finely shredded cabbage for crunch. Green onions add a fresh flavor.
– Presentation tips for an elegant touch: Arrange the chicken slices neatly on top of the rice. Drizzle tonkatsu sauce artfully over the chicken. A sprinkle of sesame seeds adds a touch of flair. Don’t forget a wedge of lime for a zesty finish!
Pro Tips
- Choose the Right Oil: Use a neutral oil with a high smoke point, like vegetable or canola oil, for frying. This ensures your chicken gets crispy without imparting any unwanted flavors.
- Keep the Oil Temperature Steady: Maintain a consistent oil temperature while frying. If the oil is too hot, the breadcrumbs may burn; if it’s too cool, the chicken will absorb excess oil and become greasy.
- Let the Chicken Rest: After frying, allow the chicken to rest for a couple of minutes before slicing. This helps the juices redistribute, keeping the meat moist and tender.
- Presentation Matters: Layer your ingredients thoughtfully in the bowl. Not only does it look appealing, but it also allows for a balanced bite of flavors with every spoonful.
Variations
Protein Alternatives
You can easily swap out the chicken in katsu bowls. Here are some tasty options:
– Pork: Use pork loin or tenderloin for a classic tonkatsu.
– Tofu: Firm tofu works great for a vegetarian option. Press it to remove water, then bread it.
– Seafood: Try shrimp or white fish for a lighter twist.
Flavor Variations
Changing the sauce or toppings can make your katsu unique. Here are some ideas:
– Sauces: Besides tonkatsu sauce, try teriyaki or spicy mayo for different flavors.
– Toppings: Add sliced radishes, pickled ginger, or avocado for extra taste and texture.
Rice Substitutes
Not a fan of jasmine rice? Here are some alternatives:
– Brown Rice: More fiber and a nutty flavor.
– Quinoa: A protein-packed option that adds a nice crunch.
– Cauliflower Rice: A low-carb choice that’s light and fluffy.
Storage Info
Leftover Storage
To keep your katsu bowls fresh, store them properly. Place the chicken and rice in separate airtight containers. This method prevents the rice from getting soggy. Refrigerate them right away, and they will stay good for up to three days. Always check for any signs of spoilage before eating.
Reheating Instructions
To enjoy your katsu bowls again, reheating is key. Use an oven or an air fryer to keep the chicken crispy. Preheat the oven to 375°F (190°C). Place the chicken on a baking sheet and heat for about 10-15 minutes. For the rice, use a microwave. Add a splash of water to keep it moist. Heat it in short bursts, stirring in between, until warm. This way, you’ll have delicious katsu bowls just like when you first made them!
FAQs
How to make katsu bowls crispy every time?
To keep katsu crispy, avoid common mistakes. First, ensure the chicken is dry before breading. Excess moisture makes the coating soggy. Second, use enough oil for frying. About half an inch deep works best. Lastly, avoid crowding the pan. Fry in batches if needed. Each piece needs space to crisp up right.
Can I use frozen chicken for katsu?
Yes, you can use frozen chicken, but follow safety tips. Thaw the chicken completely before cooking. This helps it cook evenly. Cook it to an internal temperature of 165°F (75°C) for safety. If using frozen, increase cooking time by a few minutes. Always check for doneness before serving.
What is tonkatsu sauce, and can I make it at home?
Tonkatsu sauce is a thick, sweet, and savory sauce. It pairs perfectly with katsu. You can make it easily at home. Combine these ingredients:
– 1/4 cup ketchup
– 2 tablespoons Worcestershire sauce
– 1 tablespoon soy sauce
– 1 tablespoon sugar
Mix well and adjust to taste. This simple recipe gives you a fresh, homemade sauce.
Is katsu gluten-free?
Traditional katsu is not gluten-free due to panko breadcrumbs. However, you can use gluten-free breadcrumbs instead. Look for brands made from rice or corn. Always check the labels to ensure they meet gluten-free standards. This way, you can enjoy katsu without worries.
In this blog post, we explored how to make delicious katsu bowls at home. We went over key ingredients, the step-by-step process, and tips for a crispy finish. You can adjust the recipe with different proteins or sauces to fit your taste. Remember to store any leftovers properly to enjoy later. Making katsu bowls is fun and rewarding, so gather your ingredients and start cooking. Your kitchen will be filled with joy and great flavor