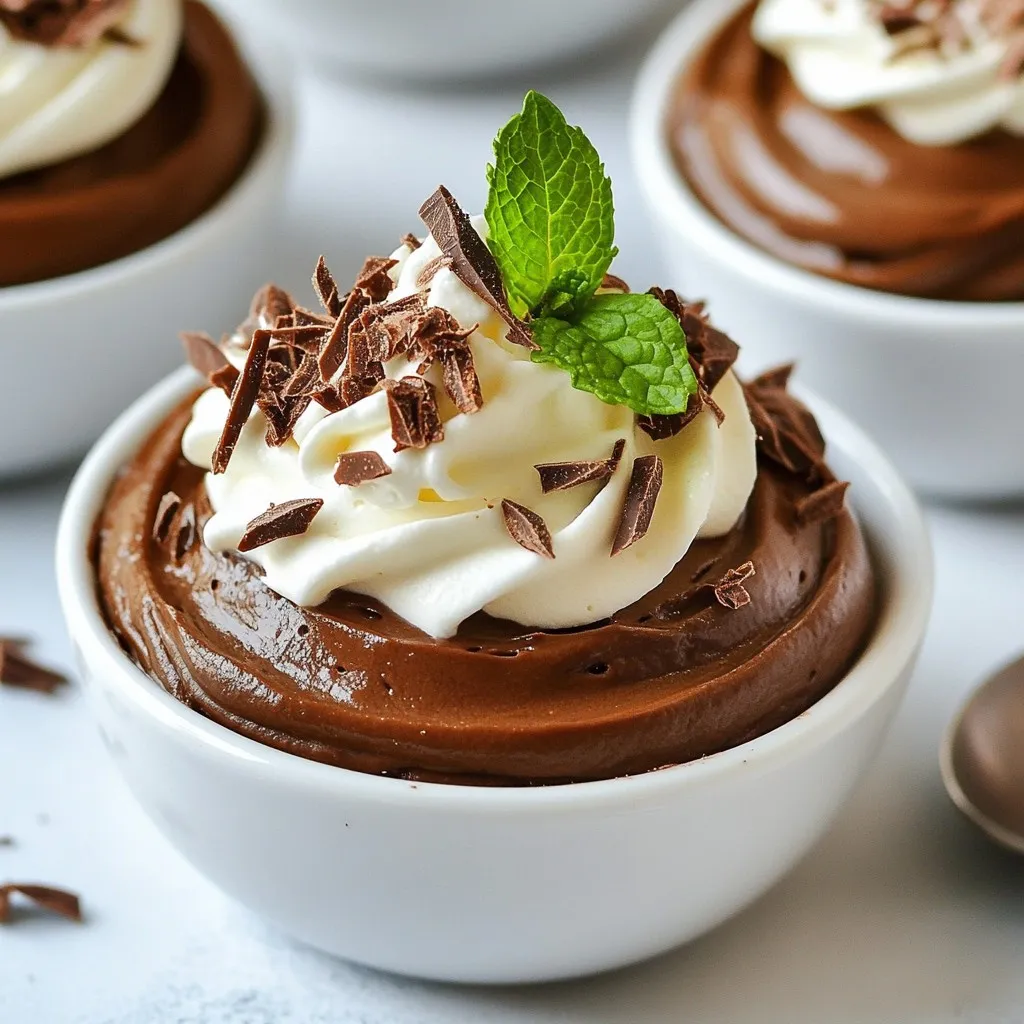
Indulge your sweet tooth this holiday season with my Decadent Christmas Chocolate Mousse Cups! These rich, creamy treats are easy to make and perfect for sharing. From dark chocolate chips to fresh mint leaves, I’ll walk you through the simple ingredients and steps needed to create a show-stopping dessert. Get ready to impress your family and friends with a dessert that embodies the spirit of Christmas. Let’s dive in!
Why I Love This Recipe
- Decadent Flavor: The rich dark chocolate combined with the creamy texture creates an indulgent treat that’s perfect for the holiday season.
- Elegant Presentation: These mousse cups look stunning, making them a beautiful addition to any festive table or gathering.
- Make Ahead: You can prepare these mousse cups in advance, allowing you to enjoy more time with your guests during the holidays.
- Customizable Toppings: The whipped cream and garnishes can be tailored to your taste, making each serving unique and personal.
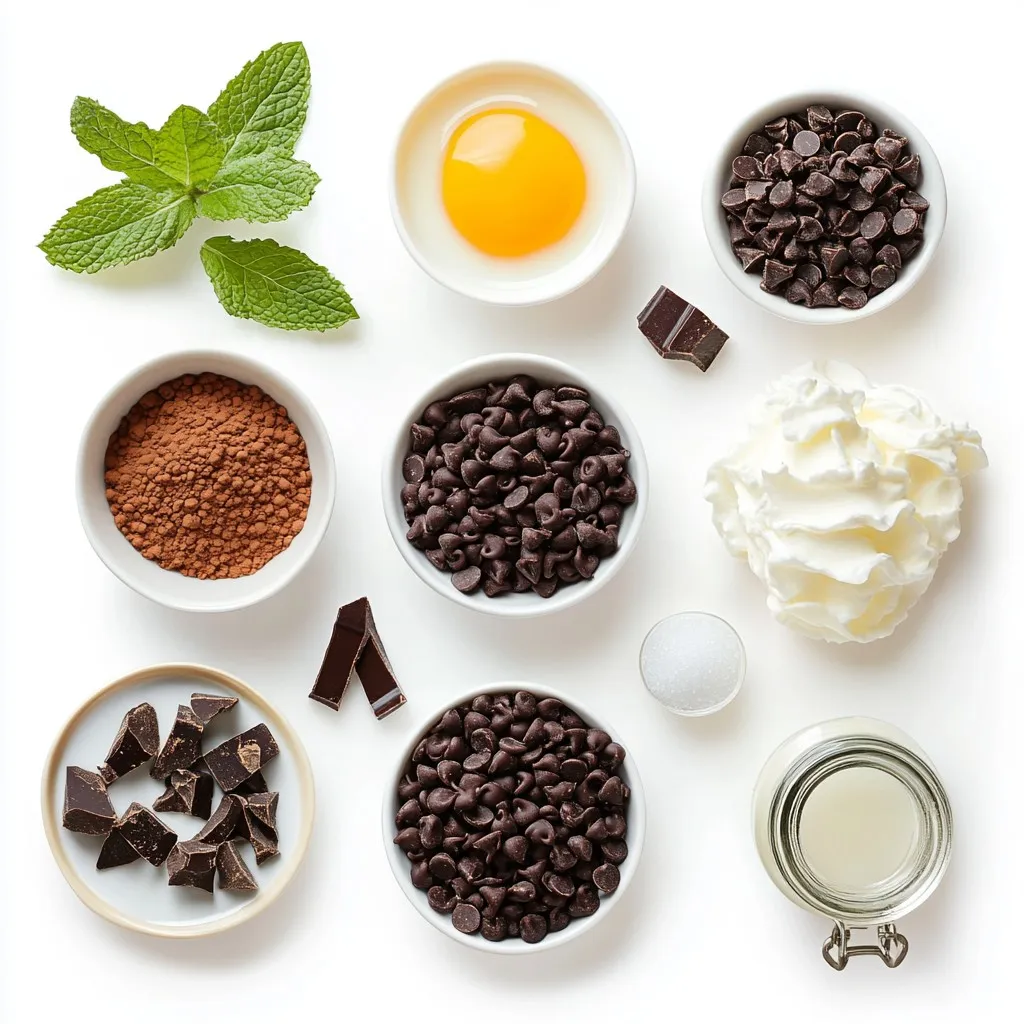
Ingredients
Main Ingredients
– 1 cup dark chocolate chips (70% cocoa or higher)
– 2 tablespoons unsalted butter
– 3 large eggs, separated into yolks and whites
– 1/4 cup granulated sugar, divided
– 1 cup heavy cream
– 1 teaspoon vanilla extract
– A pinch of salt
The main ingredients create a rich and creamy mousse. Dark chocolate chips give the dessert depth. Unsalted butter adds smoothness. Eggs, both yolks and whites, provide structure and lightness. Granulated sugar sweetens the mix. Heavy cream adds volume and softness. Vanilla extract brings warmth. A pinch of salt enhances all the flavors.
Garnishing Ingredients
– Whipped cream
– Grated chocolate or chocolate shavings
– Fresh mint leaves
Garnishing ingredients add a touch of elegance. Whipped cream makes the mousse look inviting. Grated chocolate or shavings give a nice visual contrast. Fresh mint leaves add color and a hint of freshness.
Suggested Tools
– Heatproof bowl
– Electric mixer
– Mixing bowls
– Spatula
– Piping bag or spoon
Tools make the process easier and more enjoyable. A heatproof bowl is essential for melting chocolate safely. An electric mixer helps whip egg whites and cream quickly. Mixing bowls hold the ingredients and keep things organized. A spatula is great for folding ingredients without losing air. A piping bag or spoon helps fill the cups neatly.
Step-by-Step Instructions
Preparing the Chocolate
To start, you need to melt the chocolate and butter together. Place 1 cup of dark chocolate chips and 2 tablespoons of unsalted butter in a heatproof bowl. Microwave this mix in 30-second intervals. Stir well between each interval until it’s smooth and melted. Once melted, let the mixture cool for a few minutes.
Whipping the Egg Whites
Next, let’s whip the egg whites. Take 3 large eggs and separate the yolks from the whites. Place the egg whites in a clean mixing bowl. Add a pinch of salt to help stabilize them. Use an electric mixer to beat the whites. Whip until soft peaks form. Gradually add half of the 1/4 cup of granulated sugar. Keep whisking until you get stiff peaks. Set the whipped egg whites aside.
Combining Ingredients
Now, let’s prepare the egg yolks. In another bowl, whisk the 3 egg yolks with the rest of the sugar until it turns pale and creamy. Carefully mix in the slightly cooled chocolate. Don’t forget to add 1 teaspoon of vanilla extract as well. Stir until everything is smooth. Now, gently fold the whipped egg whites into the chocolate mixture in three additions. Use a spatula to lift and fold, so you keep the air in the mix.
Chilling the Mousse
After combining, it’s time to chill the mousse. You can use a spoon or a piping bag for filling. Carefully fill your individual cups or small glasses until they are about three-quarters full. Cover them with plastic wrap and place them in the fridge. Let them chill for at least 2 hours, but overnight is best for a perfect set.
Serving Suggestions
When you are ready to serve, add a dollop of whipped cream on top of each mousse cup. For a lovely finish, sprinkle some grated chocolate or chocolate shavings on top. A fresh mint leaf adds a nice touch too. To present, arrange the cups on a decorative platter. You can place whole mint leaves around them for extra flair. Enjoy your delicious chocolate mousse cups!
Tips & Tricks
Perfecting the Mousse Texture
To get the right texture in your mousse, fold the ingredients gently. Use a silicone spatula to lift and turn the mixture. Start by adding a small amount of whipped egg whites to the chocolate. This helps to lighten it. Then, slowly fold in the rest. Be careful not to stir. Stirring will deflate your mousse, making it less airy.
Storage Advice
Keep your mousse fresh by covering it tightly with plastic wrap. You can also use a lid if your cups have one. Store your mousse in the fridge. It stays fresh for up to three days. The longer it sits, the firmer it may get. Enjoy your mousse within this time for the best taste!
Troubleshooting Common Issues
If your mousse turns out grainy, it may be due to not melting the chocolate well. Make sure to melt it slowly, stirring often. If you face deflation, this usually happens from over-folding. Always be gentle and use the right technique. If the mousse is watery, it might need more whipped cream. Add a little more whipped cream and fold gently until mixed.
Pro Tips
- Use Quality Chocolate: For the best flavor, choose high-quality dark chocolate with a cocoa content of 70% or higher. This will enhance the richness of your mousse.
- Room Temperature Ingredients: Ensure that your eggs and heavy cream are at room temperature before starting. This helps achieve a smoother and creamier mousse texture.
- Chill Your Bowls: For best results when whipping cream and egg whites, chill your mixing bowls and beaters in the refrigerator beforehand. This helps achieve better volume and stability.
- Experiment with Flavors: Add a splash of liqueur like Grand Marnier or a hint of espresso powder to the chocolate mixture for a unique flavor twist.
Variations
Flavor Enhancements
You can have fun with flavors in your chocolate mousse. Try different types of chocolate. Milk chocolate gives a sweeter taste. White chocolate adds a creamy twist. Flavored chocolate, like orange or hazelnut, can surprise your guests. For a festive kick, add liqueurs or extracts. A splash of peppermint or orange will brighten the mousse. Just a teaspoon can change your dessert!
Dietary Adjustments
If you or your guests have dietary needs, you can still enjoy this treat. For gluten-free options, check your chocolate. Most dark chocolate is naturally gluten-free. You can also use gluten-free cookies for a crust if you want to make a layered version. For dairy-free mousse, swap heavy cream with coconut cream or almond milk. This keeps the mousse rich and tasty without dairy.
Alternative Garnishes
Garnishes make your mousse look special. Fresh berries like raspberries or strawberries add color and flavor. You can also sprinkle nuts like almonds or hazelnuts for crunch. For a fun twist, use edible cups. You can find chocolate cups or even sugar cones. They make your dessert not just tasty, but also fun to eat!
Storage Info
Best Storage Practices
To keep your chocolate mousse fresh, use airtight containers. Glass or plastic containers work well. Cover each mousse cup tightly with plastic wrap. This helps prevent air from getting in and keeps the mousse creamy.
How Long to Keep
Store the mousse in the refrigerator. It lasts for about 3 to 5 days. Look for signs of spoilage like a sour smell or a change in texture. If it looks or smells off, it’s best to throw it away.
Freezing Mousse
You can freeze chocolate mousse, but it may change texture. Use a freezer-safe container. When ready to eat, thaw it in the fridge overnight. It’s best to eat frozen mousse within 1 to 2 months for the best taste and texture.
FAQs
How can I make chocolate mousse ahead of time?
You can make chocolate mousse a day in advance. Prepare the mousse and fill your cups. Cover each cup with plastic wrap. Place them in the fridge for at least two hours. This chilling time helps the mousse set perfectly. Making it ahead also saves you time on the big day.
Can I use different types of chocolate?
Yes, you can! Using milk chocolate makes the mousse sweeter and creamier. Dark chocolate gives a rich, bold flavor. White chocolate adds a sweet and buttery taste. Each type will change the mousse’s taste and texture. Experiment with different chocolates to find your favorite.
Is it safe to eat raw eggs in this recipe?
Raw eggs can be risky for some people. To stay safe, use pasteurized eggs. They are treated to kill harmful bacteria. If you prefer, you can use egg substitutes like silken tofu or whipped aquafaba. These options will still give you a nice texture.
How do I achieve the best presentation?
For a stunning look, use clear cups to show off the mousse layers. Add a dollop of whipped cream on top. Sprinkle grated chocolate or chocolate shavings for flair. Finish with a fresh mint leaf. This adds color and a festive touch. Serve the cups on a decorative platter for extra charm.
Is there an egg-free version of chocolate mousse?
Yes, there is! You can make mousse without eggs. Use silken tofu blended until smooth. Alternatively, whipped aquafaba can replace egg whites. Both options will create a creamy texture. Just adjust the sweetness to your liking. Enjoy your egg-free chocolate mousse without losing flavor!
You’ve now learned how to make chocolate mousse from start to finish. We covered the main ingredients, steps to whip it up, and tips for perfecting the texture. Don’t forget to try fun variations and presentation ideas to impress your guests.
Remember, the key is to handle ingredients gently to stay fluffy. Enjoy your mousse fresh or store it correctly for later. With practice, you’ll master this delightful treat. Enjoy every delicious bit