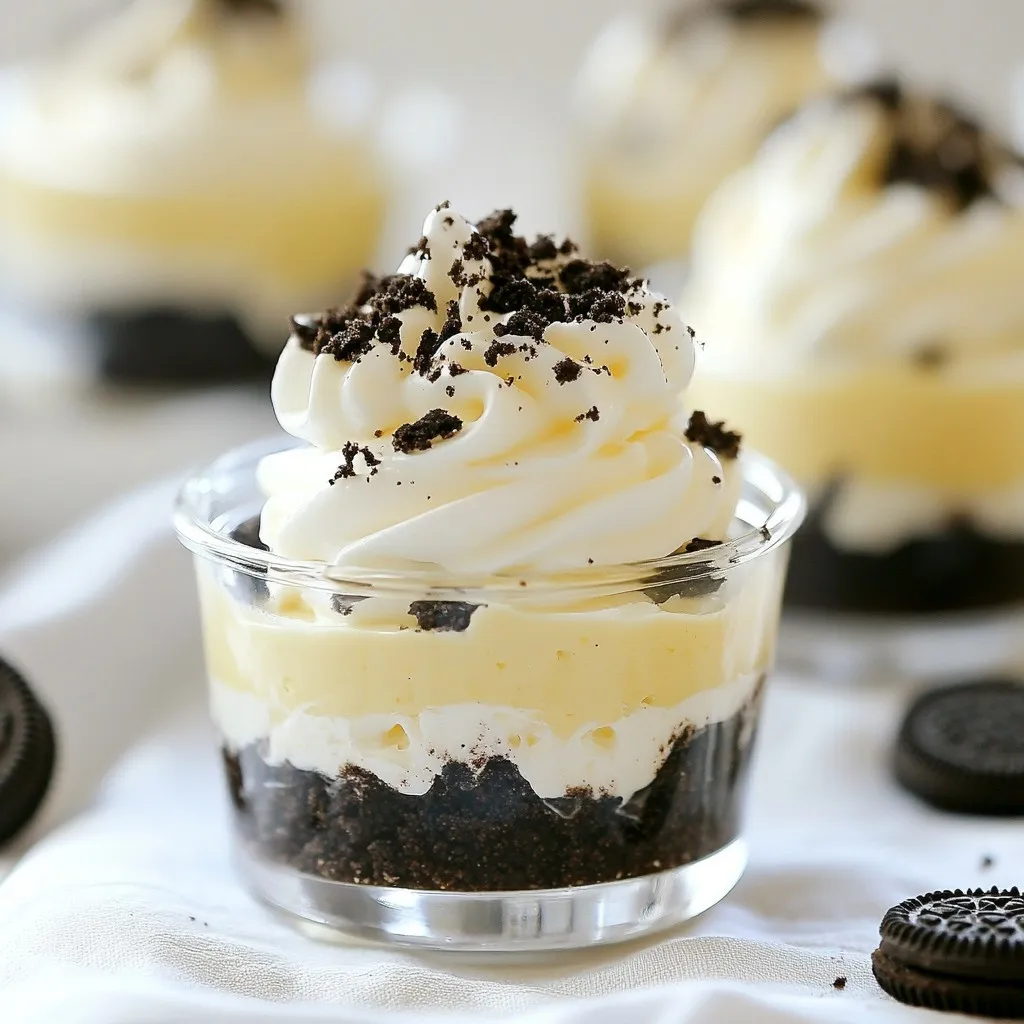
Indulge your sweet tooth with my No-Bake Oreo Cheesecake Cups! This easy treat combines creamy cheesecake with crunchy Oreo goodness. Perfect for parties or a quick dessert fix, you’ll love how simple it is to whip up. With just a handful of ingredients and no baking required, these charming cups are sure to delight everyone. Let’s dive into the steps for making this delicious dessert!
Why I Love This Recipe
- Easy to Make: This no-bake recipe requires minimal cooking skills and is perfect for beginners.
- Decadent Flavor: The combination of creamy cheesecake and crunchy Oreos creates a delightful contrast.
- Perfect for Any Occasion: These cheesecake cups are great for parties, potlucks, or just a sweet treat at home.
- Make-Ahead Convenience: Prepare these cups in advance and let them chill, saving you time on the day of your event.
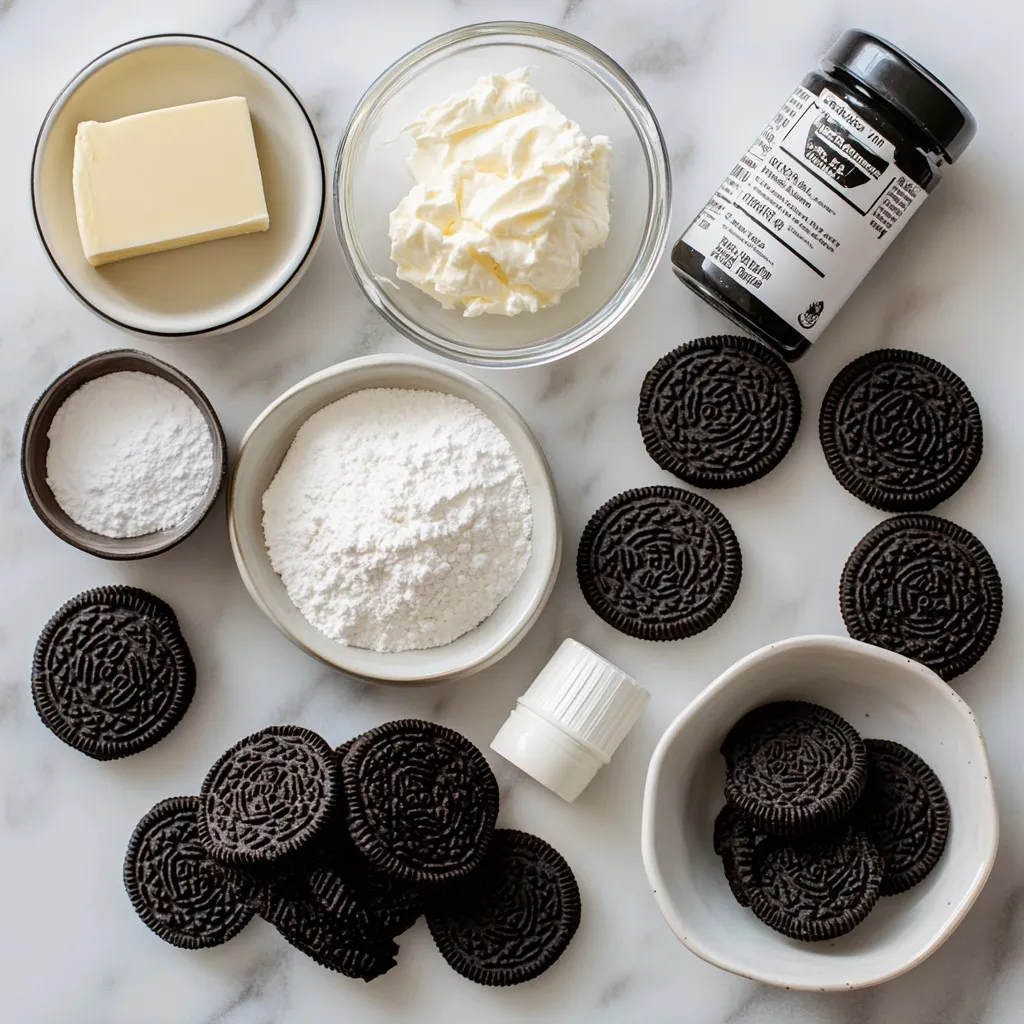
Ingredients
Creating No-Bake Oreo Cheesecake Cups is simple and fun. Here’s what you need:
– 18 Oreo cookies, finely crushed
– 4 tablespoons unsalted butter, melted
– 1 (8 oz) package cream cheese, softened
– 1/2 cup powdered sugar
– 1 teaspoon pure vanilla extract
– 1 cup heavy whipping cream, chilled
– 8 Oreo cookies, roughly chopped (for filling and topping)
These ingredients come together to make a rich and creamy dessert. The crushed Oreos form a tasty crust, while the cream cheese and whipped cream create a light filling. The added chopped Oreos give a nice crunch. Each ingredient plays a key role in the flavor and texture of your cheesecake cups. Enjoy gathering these simple items to create a delicious treat!
Step-by-Step Instructions
Create the Crust
To make the crust, start by mixing 18 finely crushed Oreo cookies with 4 tablespoons of melted butter. Stir until all the crumbs are coated. This should create a sandy texture. It’s important to ensure the butter coats every crumb. This will help hold the crust together when you layer it in the cups.
Prepare the Cheesecake Filling
Next, prepare the cheesecake filling. In a large bowl, beat 1 package of softened cream cheese until it’s smooth. This step is key for a creamy filling. Gradually add in 1/2 cup of powdered sugar and 1 teaspoon of pure vanilla extract. Mix until the mixture is fluffy and well blended. The flavor will be rich and inviting.
Whip the Cream
Now, it’s time to whip the cream. In a separate bowl, pour in 1 cup of chilled heavy whipping cream. Use an electric mixer to whip the cream until you see stiff peaks. This usually takes about 2 to 3 minutes. Be careful not to over-whip, as this can make the cream grainy. You want it light and airy.
Incorporate Oreos
Now, fold the whipped cream into the cream cheese mixture. Use a spatula to gently combine them. This keeps the mixture light. Next, add 8 roughly chopped Oreo cookies to the filling. Fold them in until they’re evenly mixed. This adds bits of cookie throughout the cheesecake.
Assemble the Cups
To assemble the cups, spoon about 2 tablespoons of the Oreo crust into the bottom of each cup. Then, add a layer of the cheesecake filling. Repeat this layering process until the cups are filled. Make sure the final layer is the creamy cheesecake filling. This will create a nice look when you serve them.
Chill and Serve
After you assemble the cups, place them in the refrigerator. Chill for at least 4 hours, or until they feel firm to the touch. This step is crucial for the right texture. Before serving, you can garnish each cup with more chopped Oreo cookies. This adds a nice touch and extra crunch.
Tips & Tricks
Achieving the Perfect Texture
To get the best texture, use room temperature cream cheese. Cold cream cheese will not mix well. This may leave lumps in your filling. Let it sit out for about 30 minutes before mixing.
When making whipped cream, use a chilled bowl and beaters. This helps the cream whip faster and get fluffy. Beat the cream until stiff peaks form, which should take about 2-3 minutes. Remember, do not over-whip the cream. If you do, it can turn grainy and separate.
Decorative Presentation Ideas
Presentation makes a big difference. Use decorative spoons for each cup. This adds a fun touch. You can also sprinkle crushed Oreos on top for a nice look and crunch.
If you want to switch up the cups, use small mason jars or dessert glasses. Clear containers let you show off the layers. It makes the dessert even more inviting.
Common Mistakes to Avoid
One common mistake is over-whipping the cream. If you whip too long, it can turn into butter. Stop once you see stiff peaks.
Another mistake is switching ingredient measurements. Use the exact amounts listed in the recipe. Changing them can affect texture and taste. Stick to the recipe for the best results.
Pro Tips
- Use Room Temperature Cream Cheese: Make sure your cream cheese is softened to room temperature for a smoother and creamier cheesecake filling. Cold cream cheese can lead to lumps in your mixture.
- Chill the Cups Overnight: For the best texture and flavor, try to let the cheesecake cups chill overnight. This allows the flavors to meld and the filling to set perfectly.
- Experiment with Flavors: Feel free to mix in different flavors of crushed cookies or add a layer of chocolate or caramel sauce for a twist on the classic Oreo taste.
- Presentation Matters: Consider using clear cups or jars to showcase the beautiful layers of the cheesecake. Adding a decorative spoon and some crushed Oreos on top can elevate the presentation even more.
Variations
Different Cookie Options
You can switch up the cookies in this recipe. For a fun twist, try using chocolate chip cookies or peanut butter cookies. Each type adds a unique flavor. If you need a gluten-free option, use gluten-free Oreos or any gluten-free cookie you enjoy. This way, everyone can enjoy these treats!
Flavor Variations
Want to change the taste? You can add chocolate or caramel flavors! Just swirl in some chocolate sauce or caramel sauce into the cheesecake filling. You can also mix in fruit purees. A layer of strawberry or raspberry puree adds a fresh touch. These options make each cup even more exciting!
Serving Suggestions
Think about what drinks pair well with these cheesecake cups. A cold glass of milk or hot coffee works great! For a fun twist, serve them with fresh fruit on the side. When you present these cups, try using clear jars. This shows off the layers and looks very pretty. Add a decorative spoon for a cute touch!
Storage Info
Best Storage Practices
To keep your No-Bake Oreo Cheesecake Cups fresh, use airtight containers. Glass jars or plastic cups work well. Make sure to cover each container tightly. This helps prevent the cheesecake from absorbing other smells in the fridge. Always place them in the refrigerator right after making them.
Shelf Life
You can store these cheesecake cups for up to five days in the fridge. Check for changes in color or texture. If the filling looks watery or the crust appears soggy, it’s time to toss them. Always trust your senses! If they smell off or have an unusual texture, it’s best to throw them out.
FAQs
Can I use low-fat cream cheese?
Yes, you can use low-fat cream cheese. However, the texture may change. Low-fat cream cheese can be a bit grainy. It also may not be as rich and creamy as regular cream cheese. This change can affect the overall taste of your cheesecake. If you want a lighter option, try it. Just know the cheesecake might not be as smooth.
How long do these need to chill?
These cheesecake cups need at least four hours to chill. Chilling helps the filling to set properly. If they do not chill long enough, they can be runny. To get the best results, aim for overnight chilling. This extra time makes the flavors meld well and enhances the taste.
Can I make them ahead of time?
You can make these cups ahead of time. They store well in the fridge for up to three days. For the best flavor and texture, make them one day before serving. This allows the flavors to develop nicely. Just cover them tightly to keep them fresh.
In this post, I covered how to make delicious Oreo cheesecake cups. You learned about the key ingredients and easy steps. I shared tips to get the best texture and avoid common mistakes. There are also ideas for fun variations and storage tips.
With these insights, you can create a tasty dessert. Enjoy making your cheesecake cups for friends and famil