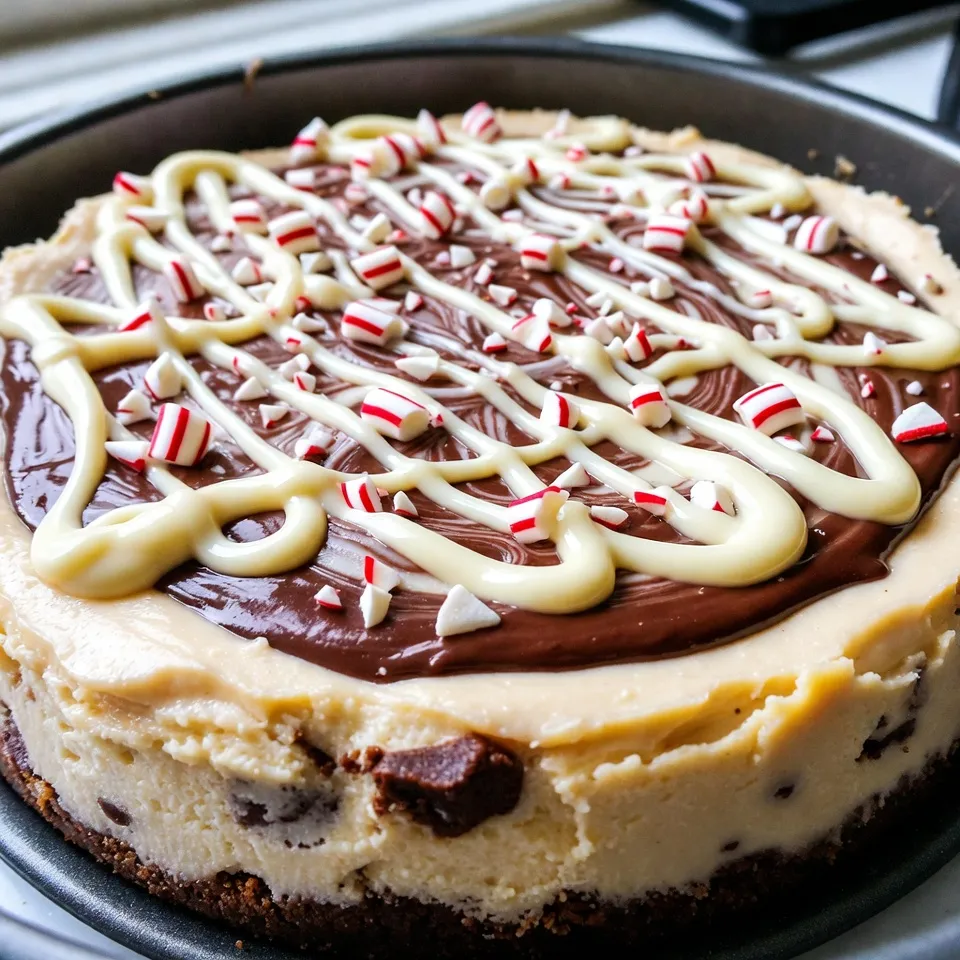
If you love creamy cheesecake and the fresh taste of peppermint, you’ll adore this No-Bake Peppermint Bark Cheesecake. It’s simple to make and perfect for any gathering. You’ll learn the right ingredients, easy steps, and clever tips to create a dessert that shines. Let’s dive into this delightful treat that combines a rich cheesecake filling with festive flavors, all without the hassle of baking!
Why I Love This Recipe
- Delicious Flavor Combination: The blend of rich chocolate, creamy cheesecake, and refreshing peppermint creates a truly indulgent dessert that captures the essence of the holiday season.
- No-Bake Convenience: This cheesecake is incredibly easy to make since it requires no baking, allowing you to enjoy a stress-free dessert preparation.
- Beautiful Presentation: The striking layers of chocolate and white chocolate, along with the festive peppermint garnish, make this cheesecake a stunning centerpiece for any holiday gathering.
- Perfect for Sharing: With enough servings for a crowd, this cheesecake is ideal for parties and family gatherings, ensuring everyone can indulge in a slice of holiday cheer.
Ingredients
Complete List of Ingredients
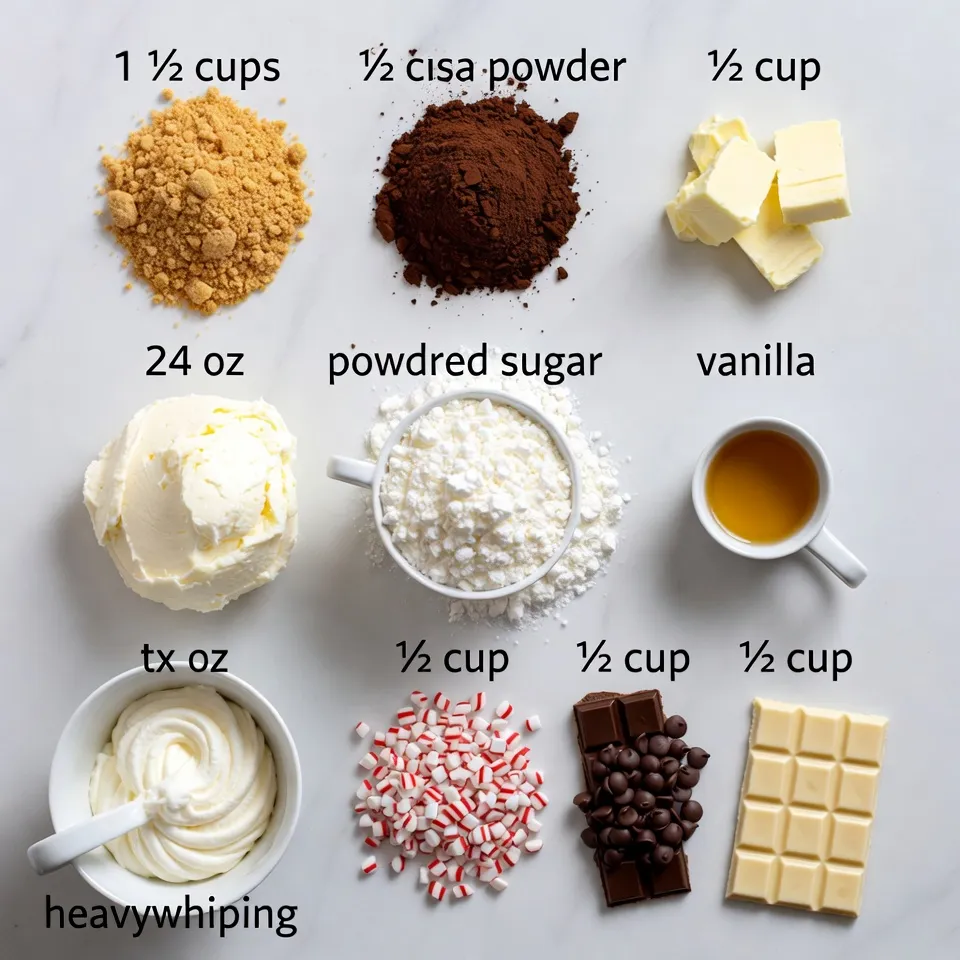
To make this no-bake peppermint bark cheesecake, you will need:
– 1 ½ cups graham cracker crumbs
– ½ cup unsweetened cocoa powder
– ½ cup unsalted butter, melted
– 24 oz cream cheese, softened
– 1 cup powdered sugar
– 1 teaspoon pure vanilla extract
– 1 cup heavy whipping cream
– ½ cup crushed peppermint candies (plus extra for garnish)
– ½ cup dark chocolate chips, melted
– ½ cup white chocolate chips, melted
Substitutions and Alternatives
You can swap some ingredients if needed. For a gluten-free crust, use gluten-free graham crackers. If you want a lighter option, try using low-fat cream cheese. You can also use crushed chocolate cookies instead of graham crackers for a different flavor. If you can’t find peppermint candies, try using crushed candy canes or mint extract for a minty touch.
Important Notes on Ingredient Quality
Quality matters in this cheesecake. Choose full-fat cream cheese for the best texture. Fresh peppermint candies can add great flavor and crunch. When selecting chocolate chips, opt for good quality brands for a richer taste. Using real vanilla extract enhances the overall flavor, so avoid imitation vanilla.
Step-by-Step Instructions
Preparing the Crust: Mixing and Pressing
To start, gather your ingredients for the crust. You need graham cracker crumbs, cocoa powder, and melted unsalted butter. In a mixing bowl, combine these three ingredients. Mix until it feels like wet sand. Then, press this mixture firmly into the bottom of a 9-inch springform pan. Make sure to spread it evenly. After pressing, place the pan in the refrigerator to chill while you work on the filling.
Making the Cheesecake Filling: Creaming the Mixture
Next, you will make the cheesecake filling. In a large bowl, add softened cream cheese. Use an electric mixer to beat it on medium speed until smooth and creamy. Slowly add powdered sugar and pure vanilla extract. Keep mixing until the mixture is fluffy and well blended. This step is key for a delicious cheesecake.
Whipping the Cream: Achieving Perfect Stiff Peaks
Now, let’s whip the cream. In a clean bowl, pour in heavy whipping cream. Use your hand mixer or stand mixer to whip it. Whip until stiff peaks form, which takes about 3 to 5 minutes. Be careful not to overmix. Once done, gently fold the whipped cream into your cream cheese mixture. A spatula works best for this. This will keep your cheesecake light and airy.
Combining Ingredients: Adding Peppermint and Chocolate
Next, it’s time to add some fun flavors. Carefully fold in crushed peppermint candies. Then, add melted dark chocolate and half of the melted white chocolate chips. Make sure everything is well mixed without deflating the whipped cream. The mix should smell great and look inviting with those vibrant colors.
Filling the Crust: Spreading the Cheesecake Mixture
Take your chilled crust from the fridge. Pour the cheesecake filling over the crust. Use a spatula to spread it evenly and smooth the top. This is where you can get creative with the presentation. Make sure the filling covers the crust well for a perfect slice later.
Chilling: Setting the Cheesecake Properly
Cover your cheesecake with plastic wrap or a lid. Place it in the refrigerator to chill. Let it set for at least 4 hours, but overnight is best. This helps the flavors blend and the texture firm up. When it’s ready, it will be a treat for both the eyes and taste buds!
Tips & Tricks
Best Practices for a Creamy Texture
To get a smooth and creamy texture, use room temperature cream cheese. Cold cream cheese can lead to lumps. Beat it well until there are no lumps. Mixing in the powdered sugar slowly helps keep it fluffy. When you whip the cream, ensure it reaches stiff peaks, but don’t overmix. Gently fold the whipped cream into the cream cheese mix. This keeps it light and airy.
How to Avoid a Cracked Cheesecake Surface
Cracked surfaces can ruin the look of your cheesecake. To avoid this, mix the filling gently. Overmixing adds air, which can create cracks. Chill your cheesecake slowly; don’t rush it. Let it cool at room temperature before refrigerating. Cover the cheesecake loosely when chilling. This prevents condensation from forming on the surface.
Recommended Tools for Easy Preparation
Using the right tools makes this recipe easier. A 9-inch springform pan is essential for easy removal. A hand mixer or stand mixer helps you whip the cream and mix the filling. A spatula is perfect for folding ingredients gently. Keep measuring cups and spoons handy for accuracy. A whisk can help combine your crust ingredients smoothly.
Pro Tips
- Chill Your Tools: For a fluffier whipped cream, chill your mixing bowl and beaters in the refrigerator for about 15 minutes before whipping. This helps achieve better volume and stability.
- Softening Cream Cheese: To ensure your cream cheese mixes smoothly, let it sit at room temperature for at least 30 minutes before use. This prevents lumps and creates a creamier texture.
- Layering Flavors: For an extra burst of peppermint flavor, consider adding a few drops of peppermint extract to the cheesecake filling. Just be cautious, as it can be quite potent!
- Serving Suggestions: Serve your cheesecake with a dollop of whipped cream and a sprinkle of extra crushed peppermint for a festive touch. It enhances presentation and adds a delightful texture contrast.
Variations
Alternative Flavor Options: Mint Chocolate, Oreo, etc.
You can change up the flavors in the No-Bake Peppermint Bark Cheesecake. For a mint chocolate version, swap out the peppermint candies for mint chocolate chips. This gives a rich, chocolatey taste with a hint of mint. If you love cookies, crush Oreo cookies instead of graham crackers for the crust. This adds a fun twist and a great cookie flavor. You can also play with other flavors like caramel or coffee for a new twist!
Adjusting Sweetness Levels
If you prefer a less sweet cheesecake, reduce the powdered sugar. Start with half a cup and taste the filling before adding more. You can also use less chocolate if it feels too sweet. If you want a sweeter treat, try adding more sugar or even a touch of maple syrup. Always taste your mixture to get the right balance!
Serving Suggestions: Toppings and Sides
When serving your cheesecake, think about fun toppings. A drizzle of warm chocolate or a dollop of whipped cream makes it even better. You can sprinkle more crushed peppermint on top for a festive touch. Serve with fresh berries or a fruit sauce for a bright flavor. Each slice can be a mini dessert experience!
Storage Info
How to Store Leftovers
To keep your no-bake peppermint bark cheesecake fresh, cover it well. Use plastic wrap or place it in an airtight container. Store it in the fridge for up to five days. This helps retain its creamy texture and flavor.
Freezing Instructions for Longer Storage
If you want to save some for later, freezing is a great option. Wrap the cheesecake tightly in plastic wrap. Then, place it in a freezer-safe container. It can last up to three months. Remember to label the container with the date.
Reheating Tips for Frozen Cheesecake
Thaw the frozen cheesecake in the fridge overnight. This keeps the texture smooth. After thawing, enjoy it cold. It tastes best chilled, just like when you first made it!
FAQs
How long does the cheesecake take to set?
The cheesecake needs to chill for at least 4 hours. For best results, let it sit overnight. This time helps it firm up well. If you cut it too soon, it may be too soft.
Can I use low-fat cream cheese?
Yes, you can use low-fat cream cheese. It will change the texture slightly. The cheesecake may be less rich, but it will still taste good.
What is the best way to slice a no-bake cheesecake?
Use a sharp knife to slice the cheesecake. Warm the knife in hot water for clean cuts. Wipe the knife with a paper towel between slices. This method keeps the pieces neat and tidy.
How can I make this recipe ahead of time?
You can prepare this cheesecake a day or two in advance. Just keep it covered in the fridge. This makes it a great choice for parties or holiday gatherings.
Can I make it without peppermint?
Absolutely! You can skip the peppermint candies for a plain cheesecake. You could also use another flavor, like vanilla or chocolate. Just adjust the toppings to match your choice.
You now have a great recipe for a no-bake cheesecake. We covered the ingredients, preparation steps, and tips. You learned how to make creamy cheesecake without cracks. I shared variations to suit your taste. Finally, I gave storage tips to help you enjoy leftovers.
Make this cheesecake for your next event. It will impress everyone! Enjoy baking and sharing this tasty trea