
If you crave a dessert that melts in your mouth, Silky Japanese Custard Purin is for you! This creamy delight hugs your taste buds with its smooth texture and rich flavor. I’ll guide you step-by-step in crafting this perfect sweet treat, from key ingredients to helpful tips. Whether you enjoy it plain or jazzed up, this purin will soon become your favorite dessert. Let’s dive in and whip up this dreamy delight!
Why I Love This Recipe
- Delicate Texture: The combination of eggs and milk creates a custard that is incredibly smooth and silky, making each bite a delight.
- Simple Ingredients: With just a handful of common ingredients, this recipe is easy to whip up, perfect for both beginners and experienced cooks.
- Versatile Toppings: The custard pairs beautifully with caramel sauce and fresh berries, allowing you to customize each serving to your liking.
- Impressive Presentation: Once inverted, the custard showcases a glossy surface that is sure to impress your guests at any gathering.
Ingredients
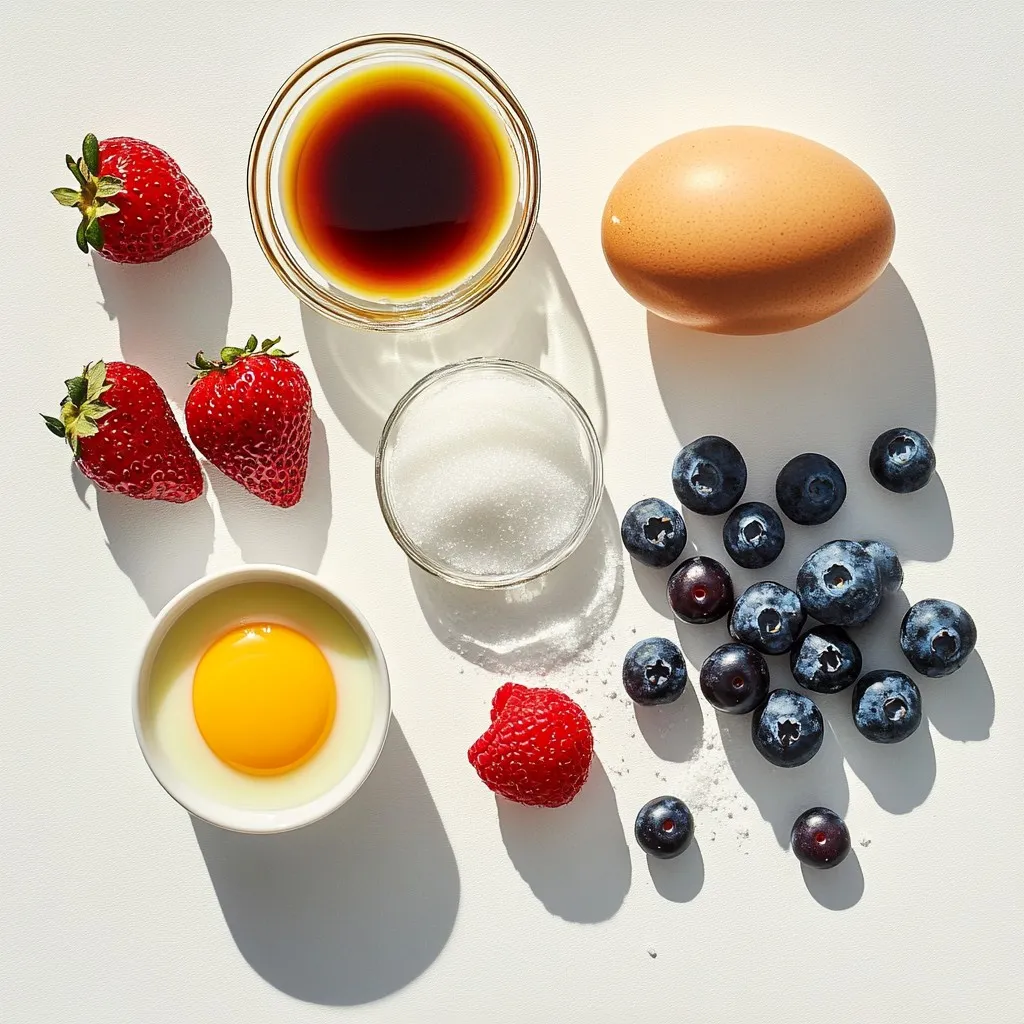
Key Ingredients for Silky Japanese Custard Purin
To make this creamy dessert, you will need:
– 2 large eggs
– 1/4 cup granulated sugar
– 1 cup whole milk
– 1/2 teaspoon vanilla extract
– 1 tablespoon cornstarch
– A pinch of salt
Each ingredient plays a key role. The eggs give the custard its rich texture. Sugar adds sweetness, while whole milk makes it creamy. Vanilla extract brings warmth, and cornstarch helps thicken the mixture. The pinch of salt balances the flavors.
Optional Garnishes and Toppings
You can add some fun toppings to make your purin special:
– Caramel sauce (store-bought or homemade)
– Fresh berries (like strawberries or blueberries)
Drizzling caramel sauce on top adds sweetness and a nice look. Fresh berries not only taste great but also add color. You can mix and match these for your perfect dessert.
Equipment Needed for Preparation
To prepare the silky custard, gather these kitchen tools:
– Mixing bowl
– Whisk
– Saucepan
– Fine-mesh sieve
– Ramekins (6 small ones)
– Baking dish for water bath
These tools help you mix, cook, and serve the custard smoothly. Using the right equipment makes the process easier and more fun.
Step-by-Step Instructions
Preheat and Prepare Your Oven
Start by preheating your oven to 350°F (175°C). While it heats, grab six small ramekins. Lightly grease each with cooking spray or butter. This helps the custard slide out easily later.
Mixing the Custard Base
In a mixing bowl, whisk together two large eggs and 1/4 cup of granulated sugar. Beat them until they look light and frothy. This adds air and makes your custard silky.
Combining and Straining the Mixture
Next, heat 1 cup of whole milk in a saucepan over medium heat. Add 1/2 teaspoon of vanilla extract and a pinch of salt. Stir occasionally until the milk is warm, but do not let it boil. Slowly pour the warm milk mix into the eggs while whisking continuously. This keeps the eggs from cooking too fast.
In a small bowl, mix 1 tablespoon of cornstarch with a tablespoon of cold water until smooth. Stir this into your custard base to make it creamier. Now, pour the mixture through a fine-mesh sieve into another bowl. This step removes lumps, giving you a velvety texture.
Baking the Custard in a Water Bath
Carefully distribute the custard into the prepared ramekins. Fill them just below the rim. Place the ramekins in a deep baking dish. Pour hot water into the dish until it reaches halfway up the sides of the ramekins. This water bath helps cook the custard evenly.
Gently place the baking dish in the oven. Bake for about 30-35 minutes. The custard should look set but still wobble in the center. This wobble indicates a perfect silky texture.
Cooling and Serving Tips
Once baked, take out the ramekins from the hot water bath. Let them cool at room temperature for 10 minutes. Then, refrigerate the ramekins for at least 2 hours. This helps the custard set fully and chill.
When ready to serve, run a small knife around the edge of each custard. Carefully invert it onto a plate. Drizzle with caramel sauce and add fresh berries if you like. Enjoy your creamy and dreamy dessert!
Tips & Tricks
Achieving the Perfect Silky Texture
To get that smooth and creamy texture, follow these tips:
– Whisk Eggs Well: Beat the eggs and sugar until they are light and frothy. This adds air and makes the custard fluffy.
– Warm Milk Gently: Heat the milk until it’s warm, but not boiling. Boiling can ruin the custard texture.
– Slow Mixing: Pour the warm milk into the egg mixture slowly while whisking. This helps the eggs stay smooth.
Common Mistakes to Avoid
Here are some mistakes you should steer clear of:
– Skipping the Straining: Always strain the mixture before baking. This removes lumps and ensures a silky finish.
– Overbaking: Watch your custard closely in the oven. It should jiggle slightly in the middle when done. Overcooking makes it rubbery.
– Not Using a Water Bath: Baking without a water bath can lead to uneven cooking. The water heat helps cook the custard gently.
Customization Tips for Flavor Enhancements
Make your purin special with these ideas:
– Add Matcha: Mix in a teaspoon of matcha powder for a green tea flavor.
– Citrus Zest: A little lemon or orange zest brightens the taste.
– Different Extracts: Swap vanilla for almond or coconut extract for a twist.
These tips will help you create the perfect silky Japanese custard purin every time. Enjoy experimenting with flavors!
Pro Tips
- Use Fresh Eggs: For the best flavor and texture, always use the freshest eggs possible. Fresh eggs will give your custard a richer taste and a better consistency.
- Monitor the Baking Time: Keep an eye on the custards during baking. Every oven is different, and slight variations in baking time can affect the final texture. Look for a slight wobble in the center to indicate doneness.
- Chill Before Serving: Allowing the custard to chill for at least 2 hours enhances its flavor and texture. The cooling process helps the custard set properly and makes it easier to unmold.
- Experiment with Flavors: Feel free to add other flavorings like matcha, almond extract, or citrus zest to customize your custard. Just be cautious with the quantities to maintain the custard’s balance.
Variations
Matcha Japanese Custard Purin
You can add matcha to your custard for a unique twist. Matcha gives the dessert a lovely green hue and a rich, earthy flavor. To make matcha purin, simply whisk in 1-2 teaspoons of high-quality matcha powder into your egg and sugar mixture. This will add depth and a hint of bitterness that balances the sweetness.
Caramel Japanese Custard Purin
If you love caramel, this version is for you. You can easily make a caramel-infused custard. Combine 1/4 cup of caramel sauce into the warm milk before mixing it with the egg base. This adds a sweet, buttery flavor throughout. You can also drizzle extra caramel on top for a beautiful finish.
Fruit-infused Japanese Custard Purin
For a fresh and fruity touch, try adding fruit flavors. You can use pureed fruits like mango, berries, or passion fruit. Blend about 1/2 cup of your chosen fruit and stir it into the milk mixture. This will give your purin a vibrant color and a delightful taste. Fresh berries on top make it even more appealing.
Storage Info
How to Store Leftover Purin
To keep leftover purin fresh, place it in the fridge. Cover each ramekin with plastic wrap to prevent drying. If you have a large batch, transfer it to an airtight container. This method helps maintain the custard’s silky texture and creamy taste.
Best Practices for Reheating
When reheating purin, do it gently. You can use a microwave or a stovetop. For the microwave, heat for 10-15 seconds at a time to avoid overheating. If you use the stovetop, place the ramekins in a pan with warm water. Heat on low until warmed through. This way, the custard stays smooth and doesn’t lose its charm.
Shelf Life of Silky Japanese Custard Purin
Silky Japanese custard purin lasts about three days in the fridge. After that, it may lose its freshness. Always check for any signs of spoilage before eating. If you notice any changes in texture or smell, it’s best to toss it. Enjoy your purin at its best!
FAQs
What is the difference between Purin and Pudding?
Purin is a Japanese dessert, while pudding is more common in Western cooking. Purin is softer and silkier than most puddings. Traditional pudding often has a thicker consistency. Purin uses simple ingredients like eggs, milk, and sugar. Pudding can include more flavors and thickeners.
Can I make Purin dairy-free?
Yes, you can make Purin dairy-free by using plant-based milk. Almond, soy, or oat milk work well. Replace the whole milk in the recipe with your chosen milk. This change may slightly alter the flavor but will still be delicious.
How can I tell if the custard is fully cooked?
You can tell if the custard is fully cooked by checking its texture. The center should jiggle slightly but not be liquid. Insert a toothpick into the custard; it should come out clean. If it has a slight wobble, it is perfectly cooked.
What can I use instead of cornstarch for thickening?
If you need a substitute for cornstarch, try using arrowroot powder or tapioca starch. Both will thicken the custard nicely. You can also use all-purpose flour, but it may change the texture slightly. Adjust the amount as needed for the best results.
You now know how to make silky Japanese custard purin. We covered key ingredients, step-by-step instructions, and helpful tips. Variations like matcha and caramel add fun twists to your purin. Plus, I shared storage tips to keep it fresh. Enjoy creating this treat, and remember, practice makes perfect. With these insights, you can impress friends and family with your skills. Happy cookin